Traverse Global v11.2 - Service Repair
Job Transactions
Use the Job Transactions function to enter and update job transactions such as quotes, estimate jobs, and approved jobs. You can also use this function to approve estimate jobs, create new job transactions from quotes, change the job status, view the contents of the Job folder, and link a transaction to another job.
You can also generate purchase orders or requisitions for the material line items on the job Estimate tab directly from the job, which results in a linked PO or requisition. This link allows the material to be added to the job detail tab when it is received (provided the PO business rule for transaction linking is set to 'Yes').
Main screen
![]()
- Use the Transaction No drop-down list on the main screen to select a job transaction to work with or create a new job transaction number manually (the job transaction number can be alphanumeric). If you create a new job transaction by using the New button on the toolbar, the system will automatically generate a new transaction number if the Business Rules -- Service Repair business rule is set to Yes.
- Select a type for the job transaction from the Trans Type drop-down list. The transaction type will determine additional options available for the job, such as a Live button available for a quote, or an Approve button available for an Estimate Job.
Once the customer approves the estimate, use the Approve button to change the estimate job to an 'Approved Job'.
By default, when you enter a new job transaction, the transaction type will be Estimate Job, but you can change it to Quote or Approved Job. Once you start filling in additional information for the job, the Trans Type field is locked. By establishing an estimate for a job, you can compare the estimate and actual costs later using the Estimate vs Actual Job report.
- If you have completed the final billing for the job transaction, select the Final Billing Complete check box.
- When the job transaction is invoiced, the Invoice Number and Invoice Amount fields will display that information.
- If you drop-ship a linked job, and there is a cost difference between the receiving cost and the invoicing cost of that PO, that cost difference will appear on the detail tab of the job transaction. See PO Receiving/Invoicing Cost Difference for more information.
-
Select "Yes" in Customer Attachment Notification Business Rule to enable a color-coded bell icon when choosing a customer with notifications in their attachments. Select "No" to maintain the default behavior.
Click a command button on the toolbar to
| Select | To |
|---|---|
| Update | Unlock fields for editing. |
| Copy | Copy estimate or detail line information from the quote, work plan, historical transaction, or job selected in the Job Type field. See Copy From for more information. |
| Live | Open a pop-up box which will allow you to choose to recalculate costs/prices on the quote, and allow you to create the job transaction as an approved job. The Live button is only enabled if the current transaction type is Quote. See Live for more information. |
| Approve | Change the transaction type to Approved Job. This will also update the Estimate Approved field on the Dates tab. The Approve button is only enabled if the current transaction type is Estimate Job. See Approve for more information. |
| Un-Approve | Change the transaction type to Estimate Job. The Un-Approve button is only enabled if the current transaction type is Approved Job. See Un-Approve for more information. |
| Job State | Change the status of the job. See Job State for more information. |
| Close Job | Close the current job. If you close the job, the job will be marked as Closed. See Close Job (Job Transactions screen) for more information. Once you close the job, you cannot make additional changes to the job state. You can also close jobs if a PO linked to it has any open items. |
| Link Trans | Link the job to other open, approved jobs with the same customer. This will allow you to send out a single invoice for all of the jobs. See Link Transaction for more information. |
| Exchange Rate | Open the Exchange Rate window to select a different rate. Once you choose the rate, click the OK button to return to the main screen. |
| Print reports. The reports available to print are determined by the transaction type. See the Print function for more information. | |
| Tax Integration |
Tax Integration has two buttons,
|
| Tax Detail |
The Tax Detail displays the available items, tax location, and tax amount.
|
| Payments | Review and/or enter external payment information for the customer. If the customer's Payment Method ID on the Defaults tab is set to an external payment processor, saved credit card information will appear in the External Payments screen for the customer. Note: You cannot add, edit, or delete external CC payment information in the detail grid. You must use the Payments button on the toolbar to open the External Payments screen to perform these actions. However, if you have an EMV (card reader) device available, you can use it to enter a new card when the Use New Card check box is marked. See the TPS Overview for more information about external payments, as well as some examples. |
| Job Folder | Open the appropriate Job folder for the current job transaction via Windows Explorer. You can set the default job folder location in the Service Repair business rules. Drag a file from your desktop or other file explorer window and drop it into any part of the open Transactions screen to save the file into the Job folder for the current job. Alternately, you can add files to the folder via the file explorer. |
| Attachments | Enter comments or attach documents relating to this work order. See Attachments for more information. NOTE: These attachments are not available through the Job Folder Attachments link on the Portal Job Information Details page. |
| Quick Invoice | Quick Invoice will be enabled only when you select Yes in business rules. Once user approve and save the data then Quick Invoice button will be enabled. So that user can view as well as update the invoice |


Header Section
Enter primary information about the job transaction on the Header tab of the Job Transactions screen.
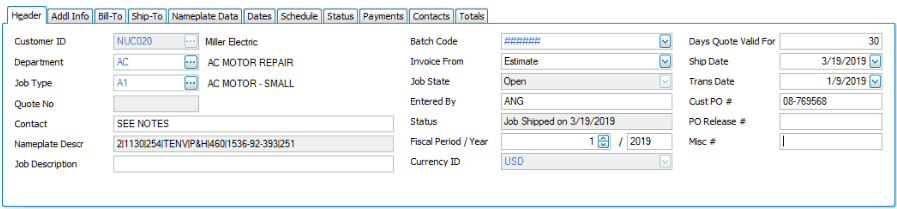
- Select a customer from the Customer ID drop-down list. If the job type for the transaction is Quote, the customer ID is not required.
You can change the customer on the job transaction as long as no billings have been prepared for the job, and no previous billings have been posted.
- Enter or select a department from the Department drop-down list for the job transaction.
- Enter or select a job type from the Job Type drop-down list. Once you select the job type, the priority and nameplate fields associated with that job type will appear on the Nameplate Data and the Schedule tabs, respectively.
If you change the job type after the nameplate data and the schedule data have been copied to the appropriate tabs, the current nameplate data and schedule information for the job will be deleted, and the information for the new job type will be copied to the appropriate tabs.
Note: If you change the job type, you can have the system recalculate the Estimate date and the confirmed Promise date. If you do so, you will have to reconfirm the promise date.
- If the job transaction type is NOT 'Quote', but was made LIVE or COPIED from a quote, the Quote No field will display the number from the originating quote.
- The contact name from the Customer file will display in the Contact field. You can change this name, if necessary.
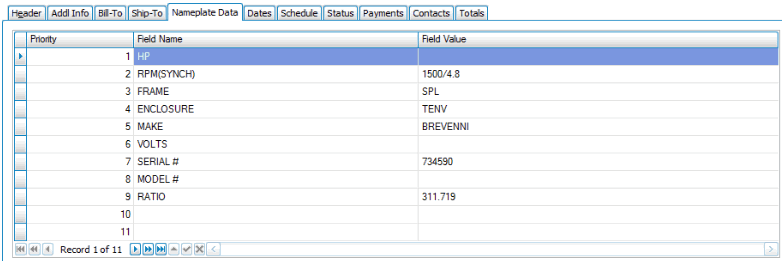
- Once data is entered into the Nameplate Data tab, the Nameplate Descr field will display the first 40 characters of the nameplate values ordered by priority, and concatenated with a pipe (|) symbol.
- Enter a job description in the Job Description field.
- Select the batch code for the job transaction, if applicable.
- Select the information to use when creating invoices in the Invoice From drop-down list. This overrides the default value for the field for this transaction only.
- Select Estimate to use transaction estimate records to generate the invoice.
- Select Detail to generate the invoice using transaction detail records. If the job transaction has the Invoice From field set to Detail, and you are printing an online Quick Delivery Ticket, you will have the option to select Print Prices and/or Print Detail on the report pick screen.
- Select Both to use transaction estimate records, if available, to generate the invoice. If estimate records do not exist, the system will use transaction detail records to generate the invoice.
- Use the Job State button on the toolbar to change the status of the job, if necessary. See Job State for more information.
- The name of the logged-in user will appear in the Entered By field by default.
- The Status field will display the most recent entry from the Status tab. If you want to add a new status, go to the Status tab and add a new entry.
- Accept or edit the Fiscal Period/Year.
- Accept or edit the Currency ID for the transaction.
- The Days Quote Valid For field will show 30 days by default, but you can change the number of days, if necessary. The number of days the quote is valid for will print on the Quote and on the Estimate.
- If the Business Rule for automatically updating the ship date is True, the Ship Date field will display the date the Delivery Ticket is printed; otherwise, you can update the ship date manually.
- The current workstation date appears in the Trans Date field by default. You can change the date if necessary.
Note: If you change the transaction date, you will get a notification dialog box asking if you would like to recalculate the Estimate Date and Promise Date. If you choose to do so, you will have to reconfirm the promise date.
- Enter the Customer PO number, the PO Release number, and/or the Miscellaneous number into the associated fields, if applicable.
The Addl Info tab of the Job Transactions screen holds secondary information about the job.
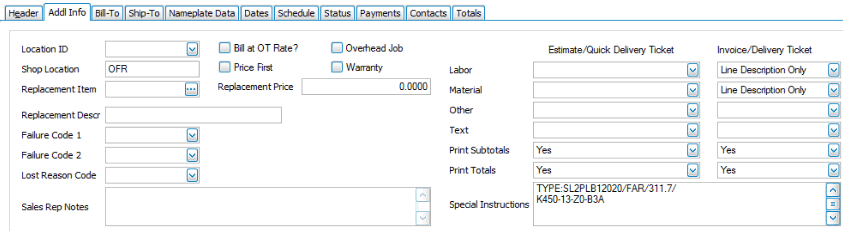
- Select a location from the Location ID drop-down list. Note: If Service Repair interfaces with Warehouse Management, the default location ID is set in the Warehouse Management business rules.
- If applicable, enter the location ID of the shop location in the Shop Location field.
- Select one or more check boxes, as applicable:
- Mark the Bill at OT Rate check box if you want to price labor lines at the overtime rate instead of the REG rate. If you want to price labor lines at the regular rate, clear the check box. This option is often used for Rush or Priority jobs.
- If the customer requires an estimate of the repair costs before the technicians start working on the job, mark the Price First check box.
- Mark the Overhead Job check box if the job is strictly overhead and not billable; otherwise, clear the check box.
- Mark the Warranty check box if the job is warranty work; otherwise, clear the check box.
- If applicable, if the replacement item is an inventory item, select the item from the Replacement Item drop-down list. The Replacement Descr and the Replacement Price fields will display the description and pricing information from Inventory.
If the replacement item is a non-inventory item, enter the item ID into the Replacement Item field, the item description into the Replacement Descr field, and the item price into the Replacement Price field.
- Select a failure code from the Failure Code 1/2 fields drop-down lists, if applicable.
- If the job was lost, select a reason code from the Lost Reason Code drop-down list.
- Enter any internal notes you wish to make about the job in the Sales Rep Notes field. These notes do not print anywhere; they are internal only.
- Printing Options: You can select the type of pricing information that appears on the Estimates, Quick Delivery Tickets, Invoices, and Delivery tickets by selecting the options for Labor, Materials, Other, Text, Print Subtotals, and Print Totals for those documents . The default values for the fields comes from the Department screen.
For Labor, Material, and Other values:
Value Will Print Detail Item ID, Description, Additional Description if checked, Unit, Quantity, Unit Price, and Extended Prices for each line item. OT, DT, and REG time will print on separate lines Line Descriptions with Extension Item ID, Description, Additional Description if checked, Extended Price Line Descriptions Only Item ID, Description, Additional Description if checked Hide (Include Price) Do not print line items, but include it in the total and the subtotal price Exclude (Do Not Include In Price) Do not print line items, and do not include it in the total or the subtotal price - For Text values, select Yes to print the text; otherwise, select No.
- For Print Subtotals, select Yes to print the subtotals; otherwise, select No.
- For Print Totals, select Yes to print the totals; otherwise, select No.
See the Form Printing Options topic for more information.
- Enter any special instructions for this job into the Special Instructions field. These instructions will print on Estimates and Quotes.
The Bill-To tab of the Job Transactions screen holds the billing information for the job.
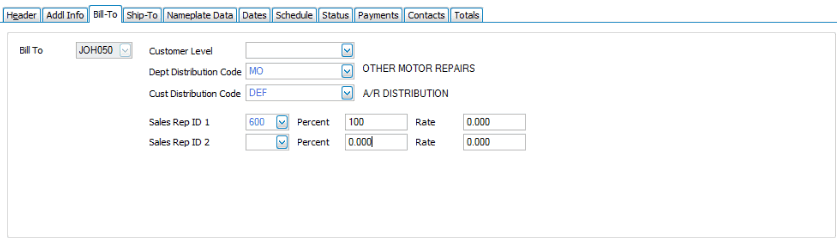
- Select the customer's bill-to address for this job from the Bill-To drop-down list.
- If the Allow Customer Level Change During Transaction Entry option in the SM Business Rules is set to Yes , you can change the customer level during transaction entry.
- The Dept Distribution Code field will display the distribution code tied to the department for the job. Select a different distribution code from the drop-down list, if required.
- The Sales Rep 1 (and Sales Rep 2, if available) for the selected customer will display in the associated Sales Rep ID field. You can select a different sales rep from the Sales Rep ID field drop-down list. The commission percent and rate appear in the Percent and Rate fields. Change the percent in the appropriate field if required. The total commission percent cannot exceed 100.
The Ship-To tab of the Job Transactions screen holds the shipping information for the job.
![]()
- By default, the customer address will appear as the ship-to address. Select or accept the ship-to ID for the customer from the Ship-To ID drop-down list. The name, attention, and address for that Ship-To ID will appear in the associated fields. You can change the Ship-To address for this job transaction; changes to the address only apply to this transaction and will not be saved in the customer's file.
- A prompt may appear asking if you would like to use the Ship-To Tax location and/or Sales Rep information. If you select Sales Rep information, the sales rep information on the Bill-To tab will populate with the Ship-To Sales Rep information.
- The customer's preferred ship method, if available, will display in the Ship Method/Via field, or select a ship method from the drop-down list. If you have not set up ship method codes, leave the Ship Method/Via field blank and enter the shipping method in the box below it.
- Enter the tracking number for the shipment in the Ship Number field, if available.
-
Enter the Latitude Coordinate of the customer region.
-
Enter the Longitude Coordinate of the customer region.
The Vaild Address check box will be selected once the address is validated.
-
Select the General Delivery check box to initiate address validation, with minimal information (Region and Postal Code).
- You can enter or change the ship-to information (name, attention, address, city, region, country, postal code) for the current job transaction; any changes made to the customer's ship-to address are only applicable to the current job transaction and will not be saved in the customer file.
Note: While creating Purchase Order from Service Repair, select the drop ship check box to populate the customer address in PO Ship To tab.
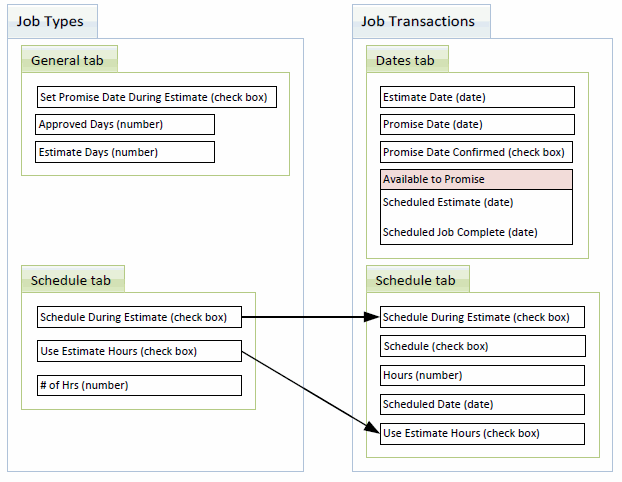
The Nameplate Data tab of the Job Transactions screen holds the nameplate priority and field names associated with the department and job type selected on the Header tab.
Enter values for the nameplate fields in the Field Value column. The Priority value determines the order in which the fields print.

The dates are as follows:
| Date | Description |
|---|---|
| Estimate Complete | Enter the date when the estimate is complete. |
| Estimate Approved | When the transaction is approved, the date of the approval will automatically load in this field. |
| Start Date | When the first Material or Labor entry line is applied to the job, the date will automatically load in this field. |
| Close Date | The date will update when the job status changes to CLOSED. Note: If the job is reopened before posting to history, the date will be reset. |
| First Labor Date | This date will update when the first Labor transaction is written to the job. |
| Last Labor Date | This date will update with the last date after every Labor transaction is written to the job. |
| Material Pick List Date | Every time the Material Pick List report is printed, this date will be updated with the date the report is printed. |
| Last Invoice Date | Every time an invoice is generated for the job, this date will be updated with the date the invoice is printed. |
| Job Priority | Select a priority code for the job. The hierarchy for jobs is: Job Priority (lowest priority code first), Customer Priority (lowest code first), Promise Date (earliest date first), Job Transaction Date (earliest first), Job creation date (earliest first). The scheduled Start/End Date/Time is based on this hierarchy and work type capacity. |
| Estimate Date | Estimate Date = Trans Date + Estimate Days (from job type) |
| Promise Date | If the job is an Estimate Job: If job type field 'Use During Estimate' is marked, Promise Date = Trans Date + Approved Days (from job type), 'Confirmed' check box on Dates tab is checked. If job type field 'Use During Estimate' is clear, Promise Date is blank. If job is an Approved Job: Promise Date = Estimate Approved Date + Approved Days (from job type) |
| Promise Date Confirmed | Mark this check box if you have confirmed the Promise Date (date you promise to deliver) with your customer. |
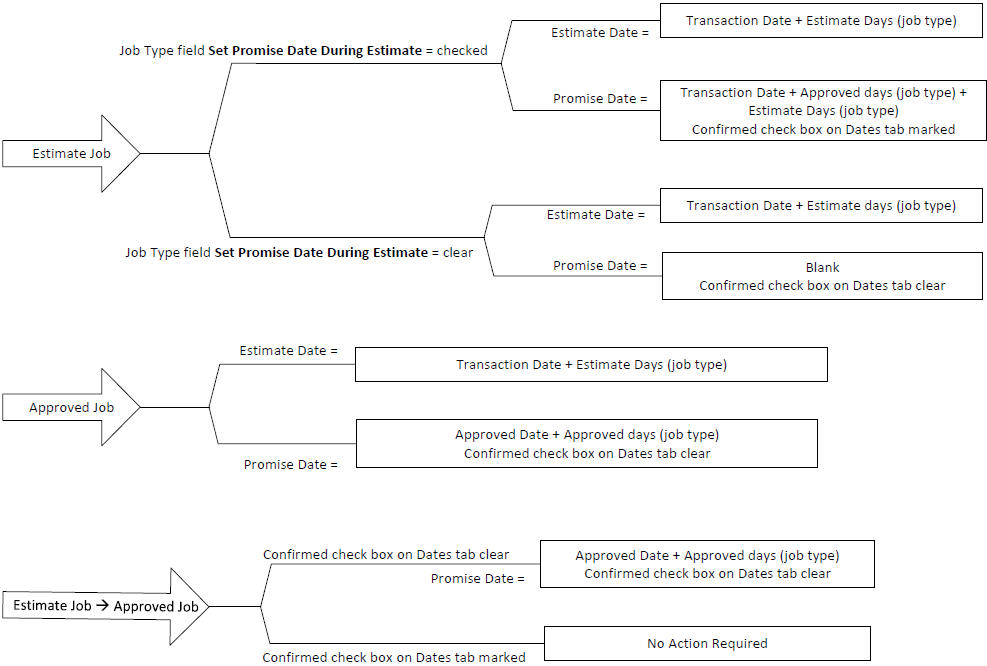
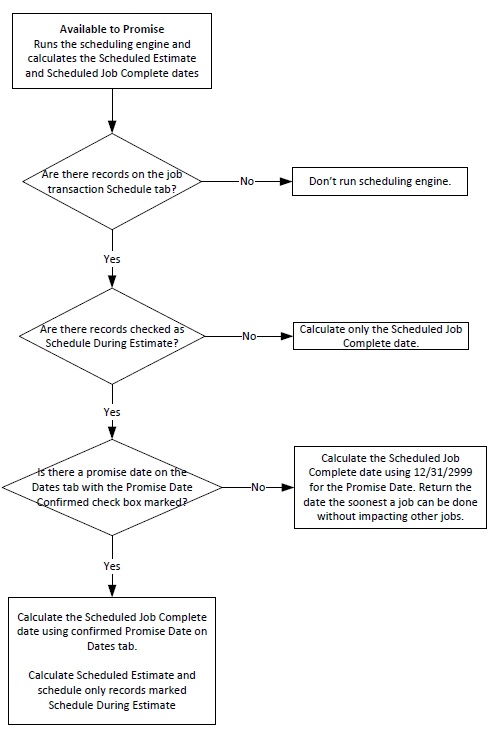
Click the Available to Promise button to run the scheduling engine and calculate the Scheduled Estimate and the Scheduled Job Complete fields. If there is no confirmed Promise Date, the Available to Promise function will return a date that is the soonest the job can be done without impacting other jobs.
The Schedule tab shows the completed dates for the work types listed. The work types listed are the work types listed on the Schedule tab for the job type in the Job Type Codes function.
The date the first labor transaction is written to the job will appear in the 1st Labor Date field. The date the work type is completed will appear in the Complete Date field.
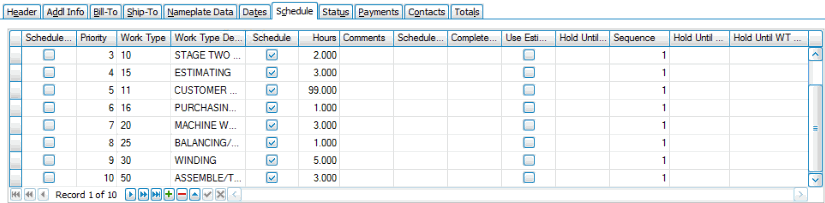
You can also use this tab to schedule the job's work types.
- Mark the Schedule During Estimate check box to automatically schedule the selected work type if the work type is an Estimate. Other work types are handled by the system if the Hours field >0. This value is defaulted from the Job Type maintenance screen Schedule tab.
- Mark the Schedule check box for the Work Types you want to schedule.
- Enter Comments as needed.
- Enter the Scheduled Date for the last selected Work Type. For each work type where the Schedule check box is marked, the system will calculate the scheduled dates for the other scheduled work types.
- Mark the Use Estimate Hours check box if you want the system to use the sum of the Quantity field (all labor codes matching the selected work type) in the Estimates tab for scheduling instead of the Hours field. If the check box is clear, you can change the hours manually, if necessary. This value is defaulted from the Job Type maintenance screen Schedule tab.
- If you don't want a work type to be scheduled until a specific date, select that date in the Hold Until Date field. The system will not schedule the work type until that date even if capacity exists. You cannot select a date in this column if you have selected a work type in the Hold Until WT field.
- The Sequence field allows you to have multiple instances of a work type on the Schedule tab. See Work Type Sequence Number for more information.
- If you want a work type to be scheduled to start only after another work type is complete, select the work type to wait for in the Hold Until WT field. The system will schedule the work type after the held work type is finished. You cannot select a work type in this column if you have selected a date in the Hold Until Date field.
- If you have chosen a work type in the Hold Until WT field, and if there are multiple occurrences of that work type on the schedule, select the sequence number of the work type in the Hold Until WT Sequence field.
- The 1st Labor Date is the first date labor is applied to the work type. This is automatically updated.
- Use the Append button (
 ) or the Delete button (
 ) as appropriate to add or remove work types on the Schedule tab.
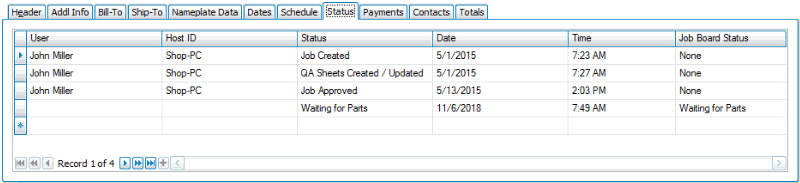
The Status tab of the Job Transactions screen shows the status records for the job. Any activity that changes the job status will be listed in the grid, along with the user who was logged in when the activity occurred, the host ID of the user's terminal, a description of the activity, and the date and time the activity occurred.
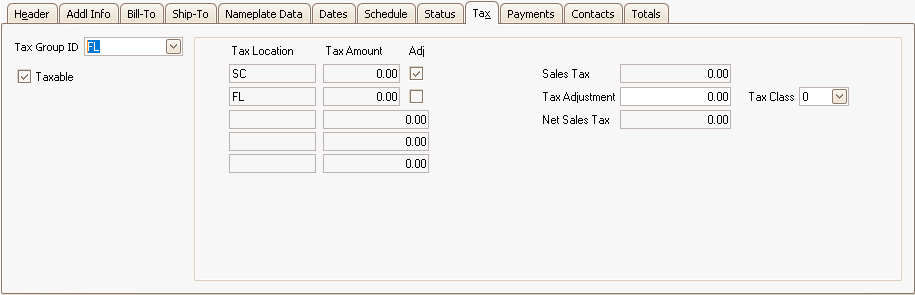
- Select the Tax Group ID associated with the customer.
- Mark the Taxable check box if the customer is set up as a taxable customer in the Accounts Receivable Customers function. Clear the check box if the transaction is nontaxable.
- The view-only Tax Location field(s) display the customer's sales tax location(s).
- The view-only Tax Amount field(s) display the customer's sales tax amount(s).
- The view-only Sales Tax field displays the gross sales tax amount.
- Mark the Adj field to enter a tax adjustment amount if you want to adjust the resulting total. Enter the Tax Adjustment amount and select a Tax Class for the adjustment.
Note:The tax adjustment amount is posted separately from the tax amount. - The view-only Net Sales Tax field displays the total sales tax amount.
The Payments tab of the Job Transactions screen allows you to add prepayments to the job.
If you have TPS functionality activated, use the Payments button on the toolbar to enter a credit card payment.
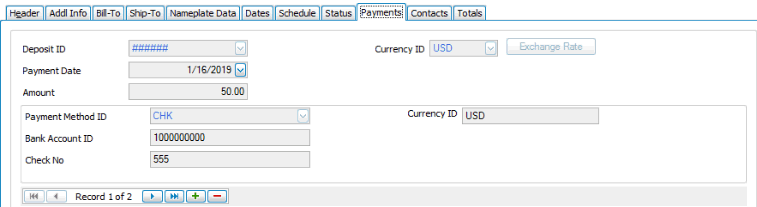
- Click the Append button () .
- Select a payment batch from the Deposit ID drop-down list.
- Accept or edit the Payment Date.
- Enter the Amount of the payment.
- If you use multi-currency, select the payment Currency ID from the drop-down list, then choose the exchange rate, if applicable, by clicking the Exchange Rate button.
- Select a Payment Method from the drop-down list. The remaining fields are determined by the payment method you choose.
- Click the Save button to save the payment information.
- Select the payment you need to edit using the record navigation buttons (
 ).
). - Make changes as required.
- Click the Save button to save your changes.
- Select the payment you want to delete using the record navigation buttons ().
- Click the Delete Record button () .
- Click the Save button to save your changes.
The Contacts tab of the Job Transactions screen shows the contacts, if any, for the customer from the Contact Defaults tab of the Customer maintenance screen. This allows you to select different contacts for different document types. If the customer has no default contacts available, you can enter a contact for a document type. Any changes you make to a contact will affect only the current transaction.
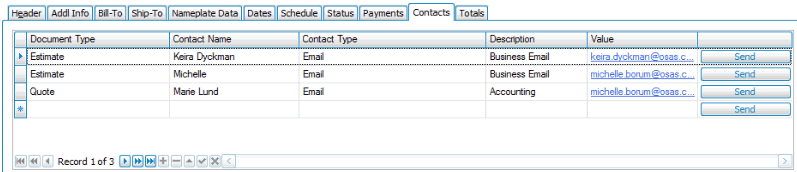
- Click the Append button to add a new contact, or select a contact to edit.
- Select a Document Type to associate with the contact.
- Select or enter a Contact Name for the document type. If there is a value in the Job Type field, this contact will be associated with the selected job type for the document type.
- Select a Contact Type. This is the contact method for the document type.
- Enter or make changes to the Contact Description.
- Enter or make changes to the customer’s contact information in the Value field. This value should match the type of contact, i.e. an email address for an email type or a phone number for a phone type.
- Click the End Edit button (
 ) when you are finished.
- If the Contact Type is 'Email', you can use the Send button to send an email to the customer that includes a PDF version of the selected document type. This will also save a copy of the PDF to the Job Folder. You can set the default job folder location in the Service Repair business rules.
- If the Contact Type is not "Email", you will get a notification message stating the contact is not valid for sending email.
- After you send a document, the Status field for the transaction will state the document type has been sent for the job.
- You cannot send a document that is not appropriate for the transaction status. For example, you cannot send a Delivery Ticket if the transaction status is 'Quote'.
You can remove a contact default record by selecting the record, and then using the Delete button ().
The Totals tab of the Job Transactions screen shows various amount totals for the job.
![]()
- Read-only fields show the amount of payments posted to the job and the total amount of payments for the job.
- If there is a value in the Quote No field, the Quote Amount field will show the sum of the Extended Price on the originating quote; otherwise, you can enter a quote amount in the Quote Amount field, if necessary.
- Enter a value into the Budget Amount field, if applicable.
- The Freight Billed field shows the amount of freight billed to the job transaction. If applicable, enter an amount for freight to include on the customer's invoice in the Freight to Bill field.
- In the Estimate Totals section (derived only from the Estimate tab):
- The Total Cost field is a running sum of the Extended Costs in the Estimate detail grid.
- The Total Taxable Sales field is a running sum of the taxable sales for the transaction.
- The Total Tax field is a running sum of the Net Sales Tax on the Tax tab. If you marked the Tax on Freight check box in the SM Tax Locations function on the Tax Setup menu, the amount of Freight To Bill will be included in the total taxable sales amount.
- The Total Nontaxable Sales field is a running sum of the non-taxable sales for the transaction.
- The Total field is a running sum of the Extended Prices in the Estimate detail grid. This is the estimated invoice total.
- The Gross Profit % field is a calculated field showing the Gross Profit percentage as a result of ((Total Est Taxable Sales + Total Est NonTaxable Sales) – Total Estimate Cost)/(Total Est Taxable Sales + Total Est NonTaxable Sales). The Gross Profit % does not include the Total Estimated Tax amount.
- The Tax Status field have three values: "Tax Calculated," "Recalculate Tax," or "None." If the user is not eligible for tax calculation, it will display as None. If the user is eligible and the tax has been calculated, it will display as Tax Calculated. If the user wants to recalculate the tax, it will display as Recalculate Tax.
Detail Section
Use the following command buttons on the menu bar to work with the line items on the job.
| Select | To |
|---|---|
| Re-sequence | Reset the line sequence numbers if you've dragged the item lines into a different order. |
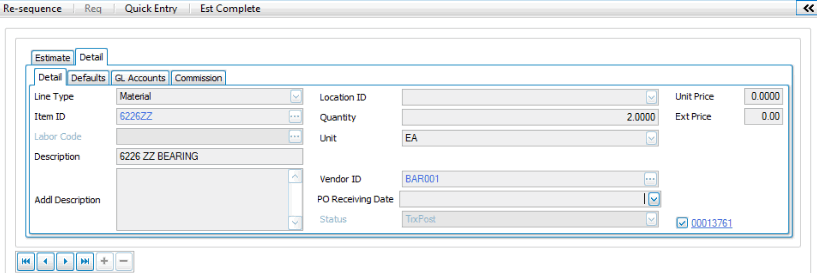
| Detail | Open a read-only Extended Qty screen displaying additional information for the material, including lot numbers or serial numbers, if applicable. Only available when on the Detail tab and a material item is selected. See Detail for more information. |
| Ser No Entry | (only appears for a serialized item) On the Detail tab, if a serialized material item is posted to the transaction, use this button to view the serial number used in that transaction. |
| PO Req | Generate a linked purchase order or requisition for the material line items. Note: The line items must have a Vendor ID selected in order to be included on the PO/Purchase Requisition. See the Link PO Transaction to SR Job Transaction topic for more information. If the PO business rule for Validate Vendor for Inventory Item is set to 'Yes', you can only select vendors that have been defined under Inventory Vendor Items when creating a PO/Purchase Requisition from Job Transaction. |
| Quick Entry | Open the Quick Entry function to add line items. |
| Est Complete | Set the job status to Estimate Complete. |
Use the Toggle button ( ) to switch between grid (summary) view and field (detail) view.
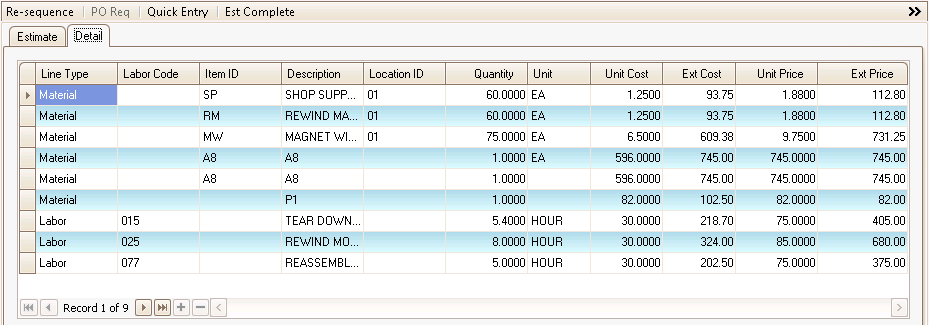
Enter line items for the job on the Estimate tab. You can enter Labor items, Material items, Text items, Other--Labor Cost/Price line types. The estimate may be used for customer billing, but is not used for calculating job cost.
When you add line items from a PO to the job, the lines for the linked items will be shaded to distinguish them from line items added from the job to the PO. Use the Linked field to see a read-only view of the linked purchase order.
NOTE: If the Business Rule to display estimate items from the PO is set to No, the linked items from a PO to the job will not be visible.
Note: You can use the Column Chooser to add the read-only Tax Class field to the grid to provide tax information. Tax is calculated using the customer's Tax Group ID or the Bill-To or Ship-To Tax Group ID. The calculation then uses the Line Type tax class, which is derived as follows:
- Material: Inventory Items/Service Items use the Item ID's tax class
- Labor: Uses the Labor Code Tax Class
- Text and Other: Use the first tax class in the list
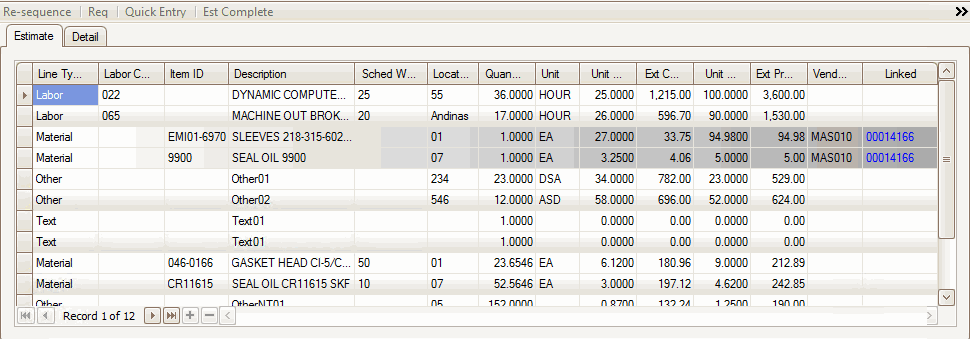
To add a new line item:
- Click the Append button () to add a blank record.
- Select a type (Labor, Material, Text, Other (Labor Cost/Price)), Freight and Charges for the line item from the Line Type drop-down list.
- If the line type is Labor, select a labor code from the Labor Code drop-down list.
- If the line type is Material, select an item from the Item ID drop-down list. If the item you wish to add is not a standard or stocked item, enter the non-inventory item ID.
- If the line type is Freight and Charges, select an item from the Item ID drop-down list.
- In the Description field, if the line type is Material, the Item description will appear. If the line type is Labor, the description for the Labor Code will appear. If the line type is Text or Other, you can enter a description.
- The Sched Work Type field allows you to assign a Work Type to one or more Material records. Only work types that appear on the Schedule tab will be valid for selection in the drop-down list. The Sched Work Type value lets the scheduling engine know that PO receipts or materials from Inventory are required prior to scheduling that work type.
- Select a location from the Location ID drop-down list.
Note: The default location ID is set in the Warehouse Management business rules if Service Repair interfaces with WM.
- Enter the number of hours (Labor line type) or the quantity of items (Material line type) for the line item into the Quantity field.
- If the line type is Material, select a unit of measure from the Unit drop-down list. If the line type is Labor, the unit will be set to HOUR and cannot be changed.
- The value in the Unit Cost field will vary depending on the line type for the record.
Line Type Source of Unit Cost Value Material, inventory item Use the Inventory Unit Cost. Material, non-inventory item The user will enter a Unit Cost. Labor Use the Labor Code Standard Labor Cost Rate. If Labor Code Standard Cost Rate is 0, use the Work Type Standard Cost Rate. If Work Type Standard Cost Rate is 0, then use Department Standard Cost Rate. Freight The user will enter a Unit Cost. Charge The user will enter a Unit Cost. Other The user will enter a Unit Cost. Note: The Unit Cost is only editable for non-inventory Material and Other line types.
- The extended cost for a line item is calculated as: Extended Cost = Quantity * Combined Unit Cost. The Ext Cost field is a read-only field.
- The value in the Unit Price field will vary depending on the line type for the record.
Line Type Source of Unit Price field Material, inventory item The Unit Price will default from standard Inventory pricing. If the inventory unit price is 0, the unit price will be: Unit Cost * Material Multiplier (in the Department setup). Material, non-inventory item The unit price will be: Unit Cost * Material Multiplier (in the Department setup). Note: Service items in SR use the inventory costing method. However, if the user changes the unit cost for a second time after a price has already been calculated in SR, when the user tabs off of that field the system will not recalculate the price. Labor The unit price will be the REG Billing Rate unless the Bill at OT Rate check box is marked, in which case the OT Billing Rate will be used.
If the Labor REG billing rate is 0, then the department labor REG billing rate will be used.
If the labor billing rate and the department billing rate are both 0, then the unit price is: Unit Cost * Labor Multiplier (in the Department setup). - The Extended Price for a line item is calculated as: Quantity * Unit Price.
- Enter or select a vendor from the Vendor ID drop-down list. This field is only available if the line type is Material. If you would like to generate a purchase requisition or purchase order (see the applicable Business Rule) from the item line, a preferred vendor must be selected.
- The Linked field indicates whether or not the line is linked to a PO line item. Double-click the blue PO Number in the Linked column to display the PO Transaction Information screen for that item. See the Link PO Transaction to SR Job Transaction topic for more information.
When you add a Material line item to the Estimate grid, and the item is a non-stock (Service) item or is not an inventory item, a message will appear notifying you the item does not exist in Inventory and asking you if you want to create a new non-stock item.
If you choose to create a new non-stock item, a Non-Stock Items window will display. The item ID you entered in the Estimate grid will appear in the Item ID field.
- Enter a Description and an Addl Descr, if applicable.
- Select a Tax Class.
- The default location ID from the Business Rules will appear in the Location field. Accept or change it as necessary.
- Select an Account Code.
- Accept or change the UOM.
- Click OK to create the item as a Service (Non-Stock) Item.
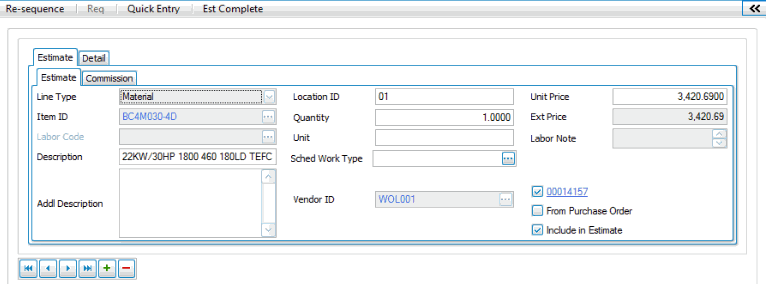
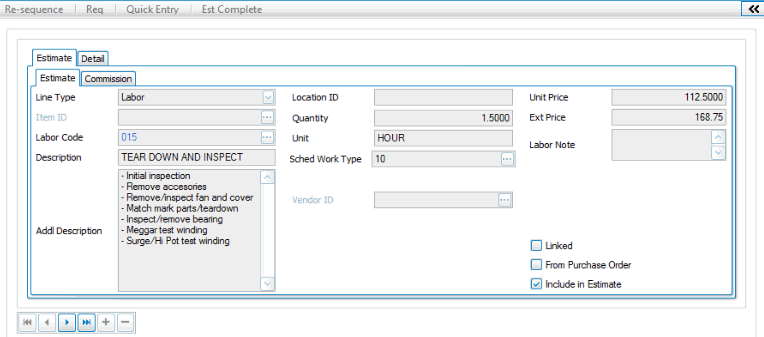
To add a new line item:
- Click the Append button () to add a blank record.
- Select a type (Labor, Material, Text, Other, Freight and Charge) for the line item from the Line Type drop-down list.
- If the line type is Labor, select a labor code from the Labor Code drop-down list.
- If the line type is Material, select an item from the Item ID drop-down list. If the item you wish to add is not a standard or stocked item, enter the non-inventory item ID.
- If the line type is Freight and Charges, select a an item from the Item ID drop-down list.
- In the Description field, if the line type is Material, the item description will appear. If the line type is Labor, the description for the labor code will appear. If the line type is Text or Other, you can enter a description.
- If the line type is Material, the Addl Description field will display the item's additional description; otherwise, enter an additional description, if applicable.
- Select a location from the Location ID drop-down list.
Note: The default location ID is set in the Warehouse Management business rules if SR is interfaced with WM.
- Enter the number of hours (Labor line type) or the quantity of items (Material line type) for the line item into the Quantity field.
- If the line type is Material, select a unit of measure from the Unit drop-down list. If the line type is Labor, the Unit will be set to HOUR and cannot be changed.
- The Sched Work Type field allows you to assign a work type to one or more records. Only work types that appear on the Schedule tab will be valid for selection in the drop-down list.
- Enter or select a vendor from the Vendor ID drop-down list. This field is only available if the line type is Material. If you would like to generate a purchase requisition or purchase order (see the applicable Business Rule) from the item line, a preferred vendor must be selected.
- The value in the Unit Price field will vary depending on the line type for the record.
Line Type Source of Unit Price field Material, inventory item The Unit Price will default from standard Inventory pricing. If the inventory unit price is 0, the unit price will be: Unit Cost * Material Multiplier (in the Department setup). Material, non-inventory item The unit price will be: Unit Cost * Material Multiplier (in the Department setup). Labor The unit price will be the REG Billing Rate unless the Bill at OT Rate check box is marked, in which case the OT Billing Rate will be used.
If the Labor REG billing rate is 0, then the department labor REG billing rate will be used.
If the labor billing rate and the department billing rate are both 0, then the unit price is: Unit Cost * Labor Multiplier (in the Department setup). - The Extended Price for a line item is calculated as: Quantity * Unit Price.
- The Labor Note field displays the value in the Note field in the Labor Codes maintenance screen.
- The Linked check box indicates whether or not the line is linked to a PO line item. Double-click the blue PO Number to display the PO Transaction Information screen for that item.
- The From Purchase Order check box indicates whether or not the line item is linked from a purchase order to the job transaction.
- If the current line item was added to the job from a purchase order, you can mark the Include in Estimate check box to include the estimate cost and price in the Totals tab estimate summary fields, and print the line on the estimate. Clear the check box to omit the cost and price from the Totals tab, as well as omit the line from the estimate.
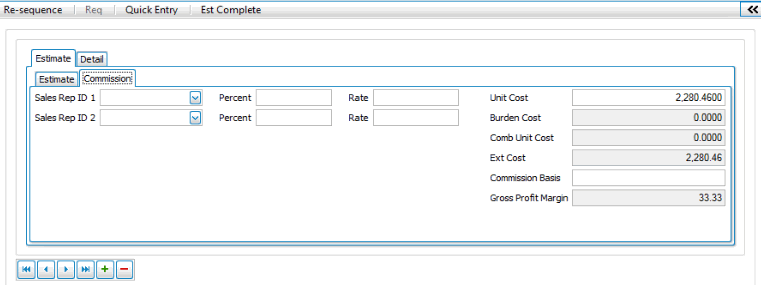
- The Sales Rep 1 (and Sales Rep 2, if available) for the selected customer will display in the associated Sales Rep ID field.
- The commission percent and rate appear in the Percent and Rate fields. The total commission percent cannot exceed 100.
- The value in the Unit Cost field will vary depending on the line type for the record.
Line Type Source of Unit Cost Value Material, inventory item Inventory Unit Cost. Material, non-inventory item The user will enter a Unit Cost. Labor Use the Labor Code Standard Labor Cost Rate. If Labor Code Standard Cost Rate is 0, use the Work Type Standard Cost Rate. If Work Type Standard Cost Rate is 0, then use Department Standard Cost Rate. Freight The user will enter a Unit Cost. Charge The user will enter a Unit Cost. Other The user will enter a Unit Cost. Note: The Unit Cost is only editable for non-inventory Material and Other line types.
- The Burden Cost will be calculated from the Burden % in the Department setup.
- Combined Unit Cost = Unit Cost + Burden Cost
- Extended Cost = Quantity * Combined Unit Cost
- The Commission Basis field shows whether commission is based on Booked Sales (when sales orders are written) or Paid Invoices (when sales orders are paid).
- The view-only Gross Profit Margin field displays the gross profit margin for the transaction.
The detail information comes from actual posted transactions from Time Card and Material Charges.
If you do not see this tab, you may not have permission to access it, or the transaction type = 'Quote'.
You cannot add any lines to this tab. Use the Estimates tab or the Edit Billings function to add or edit any lines that appear on the Detail tab.
Use the Column Chooser to add fields to the grid, if necessary.
You cannot add any lines to this tab. Use the Estimates tab or the Edit Billings function to add or edit any lines that appear on the Detail tab.
Serialized Item

- The Line Type field displays the type (Labor, Material, Text, Other) for the line item.
- If the line type is Labor, a labor code appears in the Labor Code field.
- If the line type is Material, Freight and Charge an Item ID will appear in the associated field.
- If the selected material line is a serialized item, the Ser No Entry button will appear. Use the Ser No Entry button to view details of the serialized item.
- In the Description field, if the line type is Material, the item description will appear. If the line type is Labor, the description for the labor code will appear. If the line type is Text or Other, the description entered on the Estimate tab appears.
- The Location ID appears.
- The number of hours (Labor line type) or the quantity of items (Material line type) for the line item appears in the Quantity field.
- If the line type is Material, the Unit of measure from the Estimate tab appears. If the line type is Labor, the unit will be set to HOUR.
- The value in the Unit Cost field will vary depending on the line type for the record.
Line Type Source of Unit Cost Value Material, inventory item Inventory Unit Cost Material, non-inventory item User-entered Unit Cost Labor Labor Code Standard Labor Cost Rate. If Labor Code Standard Cost Rate is 0, use the Work Type Standard Cost Rate. If Work Type Standard Cost Rate is 0, then use Department Standard Cost Rate. Freight User-entered Unit Cost. Charge User-entered Unit Cost. Other User-entered Unit Cost - Extended Cost = Quantity * Combined Unit Cost.
- The value in the Unit Price field will vary depending on the line type for the record.
Line Type Source of Unit Price field Material, inventory item The Unit Price will default from standard Inventory pricing. If the inventory unit price is 0, the unit price will be: Unit Cost * Material Multiplier (in the Department setup). Material, non-inventory item The unit price will be: Unit Cost * Material Multiplier (in the Department setup). Labor The unit price will be the REG Billing Rate unless the Bill at OT Rate check box is marked, in which case the OT Billing Rate will be used.
If the Labor REG billing rate is 0, then the department labor REG billing rate will be used.
If the labor billing rate and the department billing rate are both 0, then the unit price is: Unit Cost * Labor Multiplier (in the Department setup). - Extended Price = Quantity * Unit Price.
You can use the Column Chooser to add the read-only Tax Class field to the grid to help you understand how tax is calculated on items. Tax is calculated using the customer's Tax Group ID or the Bill-To or Ship-To Tax Group ID. Then the calculation uses the Line Type tax class, which is derived as follows:
| Line Type | Tax Class Used |
|---|---|
| Material, Inventory/Service items | Item ID's tax class |
| Material, non-inventory item | Business Rule 'Default Non-Inventory Material Tax Class' |
| Labor | Labor Code Tax Class |
| Text | Uses the first tax class in the list |
| Other | Uses the first tax class in the list |
All fields are read-only. Use the Estimates tab or the Edit Billings function to add or edit any lines that appear on the Detail tab.
- The Line Type field displays the type (Labor, Material, Text, Other) for the line item.
- If the line type is Labor, a labor code appears in the Labor Code field.
- If the line type is Material, Freight and Charge an Item ID will appear in the associated field.
- In the Description field, if the line type is Material, the Item description will appear. If the line type is Labor, the description for the Labor Code will appear. If the line type is Text or Other, the description entered on the Estimate tab appears.
- If the line type is Material, the Addl Description field will display the item's additional description, if available.
- The Location ID appears.
- The number of hours (Labor line type) or the quantity of items (Material line type) for the line item appears in the Quantity field.
- If the line type is Material, the Unit of measure from the Estimate tab appears. If the line type is Labor, the unit will be set to HOUR.
- The value in the Unit Price field will vary depending on the line type for the record.
Line Type Source of Unit Price field Material, inventory item The Unit Price will default from standard Inventory pricing. If the inventory unit price is 0, the unit price will be: Unit Cost * Material Multiplier (in the Department setup). Material, non-inventory item The unit price will be: Unit Cost * Material Multiplier (in the Department setup). Labor The unit price will be the REG Billing Rate unless the Bill at OT Rate check box is marked, in which case the OT Billing Rate will be used.
If the Labor REG billing rate is 0, then the department labor REG billing rate will be used.
If the labor billing rate and the department billing rate are both 0, then the unit price is: Unit Cost * Labor Multiplier (in the Department setup). - Extended Price = Quantity * Unit Price.
- The Linked check box indicates whether or not the line is linked to a PO line item. Double-click the blue PO Number to display the PO Transaction Information screen for that item.
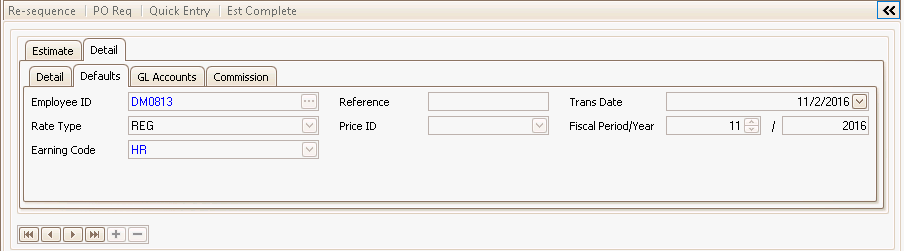
On the Labor types of lines for the job, the Defaults tab shows read-only employee information that comes from time card entry posts.
The GL Accounts tab displays the GL accounts from the posting of labor or material transactions to the job. The accounts come from the distribution code of the department to which the job is tied. These accounts will be used when posting after preparing billings and printing invoices. You can edit these accounts, if available, in the Edit Billings screen. Any changes will apply only to this transaction.
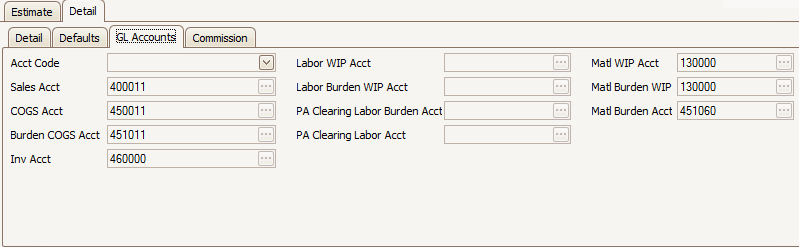

- The Sales Rep 1 (and Sales Rep 2, if available) for the selected customer will display in the associated Sales Rep ID field. You may be able to edit these fields.
- The commission percent and rate appear in the Percent and Rate fields. The total commission percent cannot exceed 100. You may be able to edit these fields.
- The value in the Unit Cost field will vary depending on the line type for the record.
Line Type Source of Unit Cost Value Material, inventory item Inventory Unit Cost Material, non-inventory item User-entered Unit Cost Labor Labor Code Standard Labor Cost Rate. If Labor Code Standard Cost Rate is 0, use the Work Type Standard Cost Rate. If Work Type Standard Cost Rate is 0, then use Department Standard Cost Rate. Other User-entered Unit Cost - The Burden Cost will be calculated from the Burden % in the Department setup.
- Combined Unit Cost = Unit Cost + Burden Cost
- Extended Cost = Quantity * Combined Unit Cost
- The Commission Basis field shows whether commission is based on Booked Sales (when sales orders are written) or Paid Invoices (when sales orders are paid). You may be able to edit this field.
- The Gross Profit Margin field displays the gross profit margin for the transaction.
The Task Pane for the Job Transactions screen is similar to the Customer Task Pane on the Sales Order screen, with the addition of a section of links at the bottom of the Customer tab. These links provide convenient access to various screens, including Job Detail Inquiry, Purchase Orders, Job Cost Detail Report, and others.
The Task Pane for the Job Transactions screen is similar to the Customer Task Pane on the Sales Order screen, with the addition of a section of links at the bottom of the Customer tab. These links provide convenient access to various screens, including Job Detail Inquiry, Purchase Orders, Job Cost Detail Report, and others.
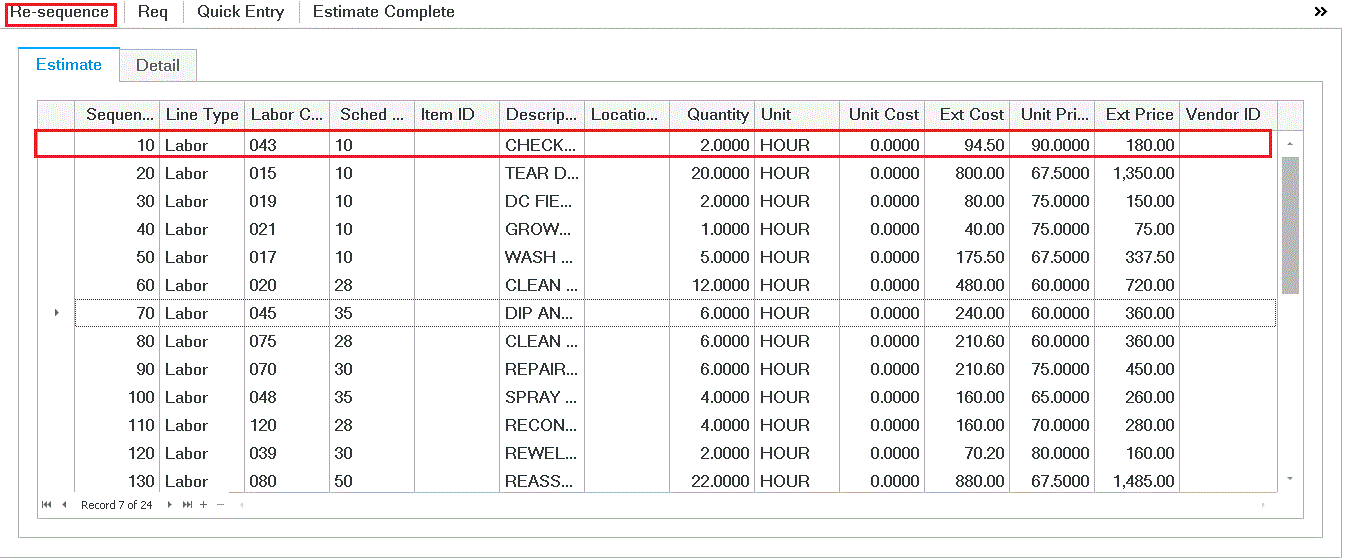
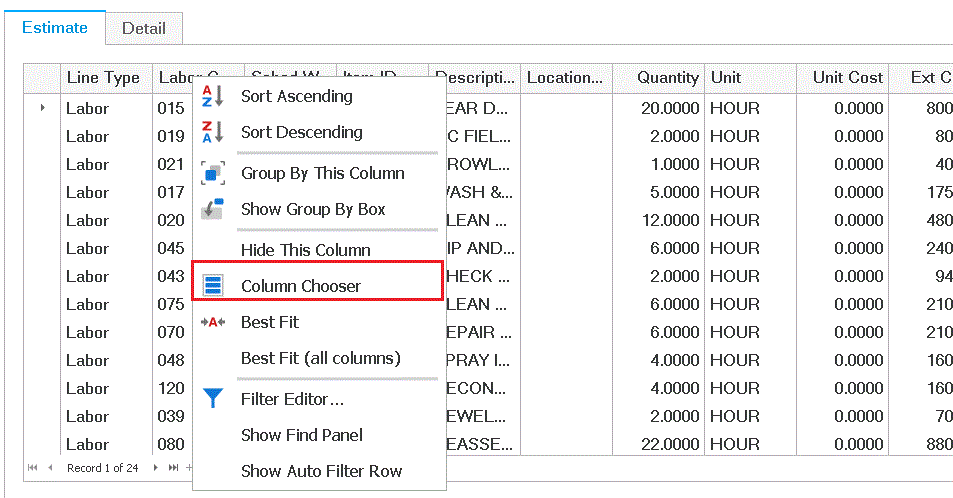
How to change sequence on Estimate Tab
-
Right click on any of the column on the Estimate tab and click on Column Chooser.
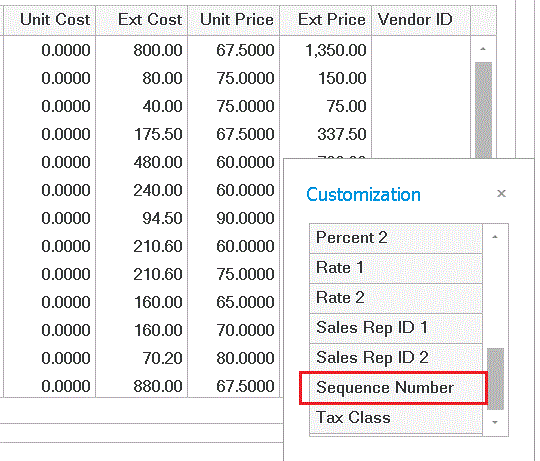
-
Scroll to the bottom of the Customization list and select Sequence Number. You will see Sequence number column added to estimate tab.
-
Click on update. Select the item you want to reposition in the list and drag and drop to the position of your choice.
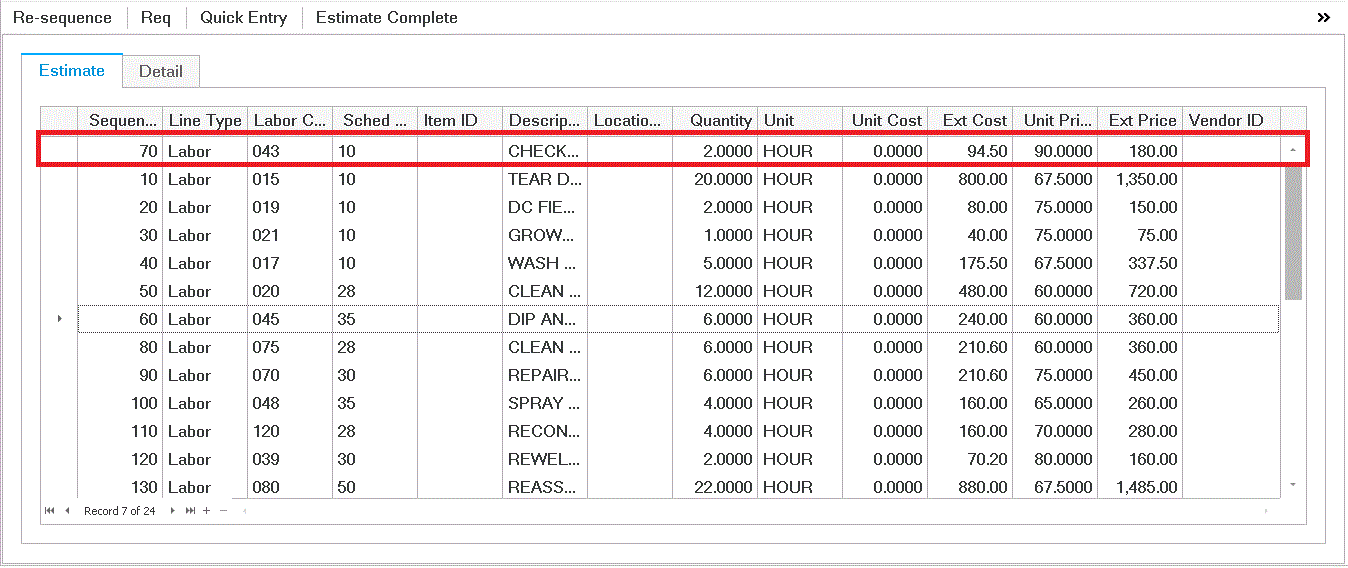
-
Once done, click on Re-sequence button to change the sequence number.