Traverse Global v11.2 - Service Repair
Setting Up a Service Repair or Inspection Configuration
Because of the amount of flexibility you have when setting up a configuration, this topic will be a tutorial of sorts that will walk you through the process. Refer to the Configurator Basic Functionality topic for more general information about the configuration maintenance screen.
Planning the configuration before you do any system entry is essential to understanding how you want the configuration to work. To guide you through the process of creating an inspection configuration, we will use a sample configuration. We will walk through the planning, then the system entry for the configuration to help you understand the options available and the results determined by those options.
When you create a new inspection configuration, you can mark it as a template. By designating a configuration as a template, you cannot set it as a default inspection or use it when adding a new inspection to a service transaction. If a configuration is marked as a template, you can use the template when creating new configurations. If you make changes to the template, such as adding groups or fields, you can synchronize those changes to each inspection you created using that template by clicking Sync on the toolbar.
For an inspection configuration, determine what you want the inspection to entail. For this tutorial, we will create a basic motor inspection.
Before doing any entries into the system for your configuration, you need to plan what you want to inspect, the options you will present to the user, and the pricing scheme you want to use for the inspection and any replacement items.
What does the inspection encompass?
Examples of parts of the inspection:
- Clean parts, initial evaluation
- Visual inspection
- Mechanical inspection
What details are included in the inspection?
Examples of entries on an inspection task list:
- Bearing evaluation
- Shaft evaluation
- Inspect for cracks, wear
Do any of the inspection options depend on the results of other parts of the inspection?
Examples of options that depend on the results of other parts of the inspection:
- If the shaft does not turn freely, inspect the shaft for alignment.
- If the shaft does not turn freely, inspect the bearings.
- If the bearings are worn, replace bearings.
- If cracks exist, where are they located?
How do you want to price the inspection?
- Straight inventory pricing--the prices of the replacement items, if any, are added to the base price of the inspection.
- You want to determine the prices of some or all portions of the inspection no matter what the inventory prices are for any replacement items, or there are no base inventory prices set for some components.
Other things to consider:
- Will the person doing the inspection need to enter values into the inspection paperwork?
- Are you going to use Excel inspection worksheets? Are there values to transfer from the inspection into the worksheet?
Stage 2 planning consists of laying out the inspection options.
In Stage 1, we determined the parts of the inspection:
- Clean parts, initial evaluation
- Visual inspection
- Mechanical inspection
List the details for the inspection:
- Clean parts, initial evaluation:
- Visual inspection of shaft
- Visual inspection of drive gear
- Visual inspection of windings
- Visual Inspection
- Are there visible cracks? If so, where?
- Are there visible signs of excessive wear? If so, where?
- Mechanical Inspection
- Inspect shaft
- Inspect bearings
- If bearings worn, replace
What do we include/replace:
- If the bearing is bad, replace bearing
- If the brushes are worn:
- brushes
- springs
- lock washers, nuts
- grease for bearing
- touch-up paint
More complex options we could set up might include specifics of manufacturer and model of the motor, the accepted range of output voltage and Meg-Ohm resistance, drive type, or cage type.
Set up min/max tables for ohms, amperage, items that wear such as brushes.
We will use inventory pricing where available for inventory items we need to replace.
We are going to use an Excel inspection worksheet.
Once you have a good idea of how you want to set up the inspection, you can configure the inspection in the system.
Before you start setting up the configuration, make sure all the inventory items available or that may be required during the inspection are set up in Inventory. Reference the Inventory Items setup topic for information on setting up items.
Make sure you have set a Base Price for each of the items if you want the inventory price to affect the price of the configured item.
To view item costs in the Configurator screens, if you use average costing, make sure you have set an Average cost for each item. If you use standard costing, make sure you have set a Standard cost for each item.

- Open the Configuration Maintenance function from the Configurator Setup and Maintenance menu.
- Create a new inspection by clicking the New button on the toolbar.
- Enter a description for the inspection in the Config Desc field. For example, you could enter Motor Inspection - general.
- If you want to copy from an existing configuration or template, use the Copy button on the toolbar.
Command Buttons on the toolbar:
| Select | To |
| Validate | Validate all of the configuration setup and will display a series of error messages for the more common issues it encounters. |
| Variables | Open the Variables for Configuration window to set up variables. |
| Constraints | Open the Constraints for Configuration window to set up constraints. Constraints are not available in Service Repair inspections. |
| Copy | Copy configuration information from an existing configuration description. See Copy for more information. |
| Expand/Collapse | Expand or collapse the branches in the tree view. |
| Synchronize | Synchronize any changes made to a template with all inspections created from that template. This button will only be enabled if the selected configuration is a template. Changes will only be synchronized with a configuration in which the Include in Sync check box is marked. |
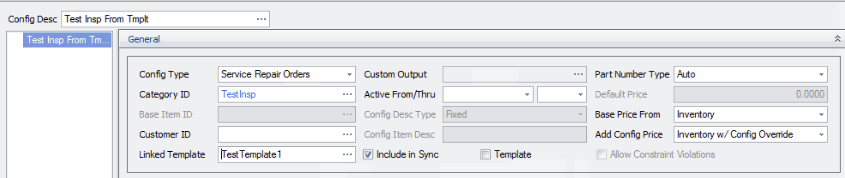
- Select Service Repair Orders as the Config Type.
- Select an appropriate inspection Category ID from the drop-down list. You can double-click in the field to open the Configuration Categories screen to add new categories.
- Because we are not setting this up for a particular customer, we will leave the Customer ID field blank.
- If you are creating a configuration from a template, select the source template from the Linked Template drop-down list. Once the inspection is linked to a template, and if the Include in Sync check box is marked, any changes you make to the template can be synchronized to the inspection using the Sync button on the toolbar.
- If you are configuring a template, mark the Is Template check box; otherwise, leave it unchecked.
- If you are using an Excel template with the inspection, select a template file from the Custom Output drop-down list. Note: You cannot enter a value into the field. You must use the Browse button to open the Custom Outputs screen. Enter a Description for the template, and then use the Browse button in the File Name field to navigate to the template file.
- Select a date range within which the inspection will be active in the Active From/Thru fields, if applicable.
- Enter a description for the configured item in the Config Item Desc field.
- In the Part Number Type field, there are 3 options:
- Auto: The system will generate a number for the new inspection you configure.
- Smart: You will use the Smart ID fields on the Field Detail screens to set up portions of the final part number.
- Smart + Sequence: The Smart part number will have a sequence number added to it. This indicates how many times the configuration has been used to build an inspection.
For our example, we will select an Auto part number.
- In the Base Price From field, there are 3 options:
- Inventory: Prices are based on the prices of inventory items.
- Configuration: This selection will enable the Default Price field. The starting base price will be the value in the Default Price field.
- None: There is no starting base price. Additional pricing may increase the base price as the configuration is used.
For our example, we will select Configuration, and set the Default Price to $350.00.
- In the Add Config Price field, there are 2 options:
- Inventory w/ Config Override: Allows you to add prices to the initial base price, if any, by pulling prices for items from inventory or from the configuration, whichever is present.
- None: Forces the system to use base pricing only, so the full and complete price of the configured item is the Default Price if available, or the inventory price for the base item. Items added via the configuration will only contribute to cost, not price.
For our example, we will select Inventory w/ Config Override.
- If you are creating a new configuration from a template, save the configuration, then click Refresh Data. The groups and questions from the template will appear. You can now add additional questions and answers as necessary.
The Groups section allows you to create different groupings of questions. Each group can focus on one aspect of the inspection--each group has its own list of questions. In our example, the inspection has a process involving initial evaluation and cleaning, mechanical inspection of the motor, and electrical inspection.
We can split these options up logically into groups: CLN (cleaning and evaluation), VSUAL (visual inspection), and MECH (mechanical inspection).
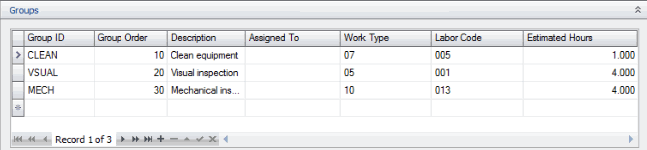
- Click in a blank record or use the Append button to create a new Group ID.
- Enter up to 5 characters for the Group ID.
- The Group Order defines the sequence in which the groups will be presented to the customer. To reorder the groups, edit the tab order.
- Enter a Description for the group.
- If the group is assigned to an individual or a queue, select that queue or technician from the Assigned To drop-down list. The list of employees is from the Payroll Employee Information function.
- If applicable, select a Work Type for the group from the drop-down list. Work type codes allow you to enter a standard labor cost rate, print job card, and select a schedule for the work type.
- If applicable, select a Labor Code for the group from the drop-down list. See Labor Codes for more information.
- If applicable, enter the number of Estimated Hours to complete the group tasks.
- Use the End Edit button (
 ) when you are finished.
The Tabs section defines the question and answer flow, pricing, etc. The Tabs section determines how the inspection configuration works.
Each group has its own list of labels/questions, so the process of setting up each field must be repeated for each group.
If you created the configuration from a template, each field (question) that originated on the template is marked in the From Template column. If you want to use the field name for a different question than the one that exists on the template, clear the From Template column. This will disconnect the field from the template so any changes to the field on the source template will not overwrite any changes you made on the configuration.
In our example, the CLEAN group questions will be presented to the user first (Tab Order = 10). Select the CLEAN group in the Groups section.
In review:
With regard to the initial evaluation:
- Visual inspection of shaft
- Visual inspection of drive gear
- Visual inspection of windings
We can include a list of options for each point of the inspection.
Field tab
Remember, you can use the Column Chooser to add columns to the grid.
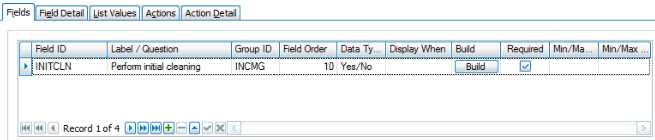
- Click in an empty record or use the Append button to add a new record.
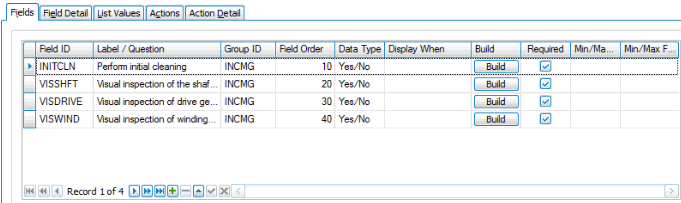
- Enter a Field ID for the first question. The field ID is a short name or identifier for the question, but is not the actual label/question. If our first question is about the initial cleaning of the motor, we can enter a field ID of INITCLN. In the Label/Question field, enter the inspection metric: Perform initial cleaning
- The Display When field is optional, but this is where you can use logic to determine whether the question or label should appear.
- The question must be answered; the user cannot skip it. Mark the Required check box to ensure the user will answer the question.
- If the field deals with tolerances--minimum and maximum measurements or quantities--the process for setting up the question is a bit different. See Using Tolerances in Configurator and Inspections for more details.
Field Detail tab
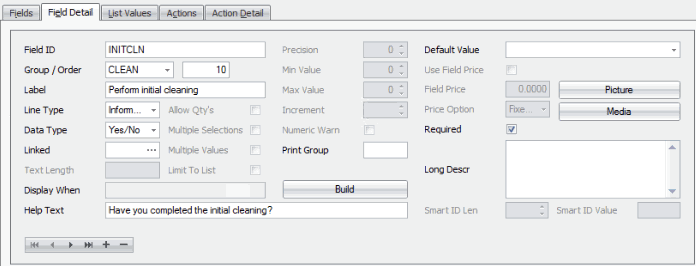
The Field Detail tab gives more detail about the selected field. Use the navigation buttons at the bottom of the tab to move from field to field.
- In the Line Type field, select Information from the drop-down list. This means the answer to the question is informational only.
- To allow the user to answer 'Yes' or 'No' to the question, select Yes/No from the Data Type drop-down list.
- You can add some additional explanation for the question in the Help Text field, if necessary.
- If applicable, select a default answer in the Default Value field. A default answer value is not required.
List Values tab
Because the question is a yes or no question, the List Values tab is not applicable. Leave it blank.
Actions tab
The Actions tab creates a list of actions to be performed. Each field on the Fields tab can have one or more Actions on the Actions tab. Since a response of 'Yes' or 'No' does not require any actions (additional inspection steps are added on the Fields tab), leave this tab blank.
Action Detail tab
The Action Detail tab is a detailed extension of the Actions tab. Each action on the Actions tab has one action on the Action Detail tab. If the Actions tab is blank, the Action Detail tab is not applicable.
Use the Save button on the toolbar to save your changes.
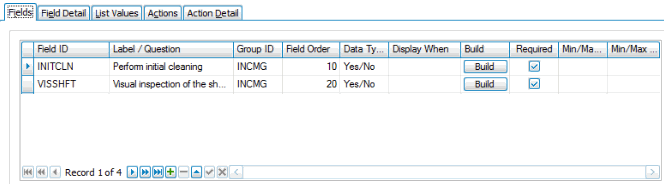
For the visual inspection of the shaft, we have a basic inspection question.
Field tab
- Click in an empty record or use the Append button to add a new record.
- Enter a Field ID. The field ID is a short name or identifier for the question, but is not the actual label/question. If our second question is about the visual inspection of the shaft, we can enter a field ID of VISSHFT.
- In the Label/Question field, enter a prompt for the inspection: Are there any obvious defects in or on the shaft?
- The prompt must be answered; the user cannot skip it. Mark the Required check box to ensure the user will answer the prompt.
Field Detail tab
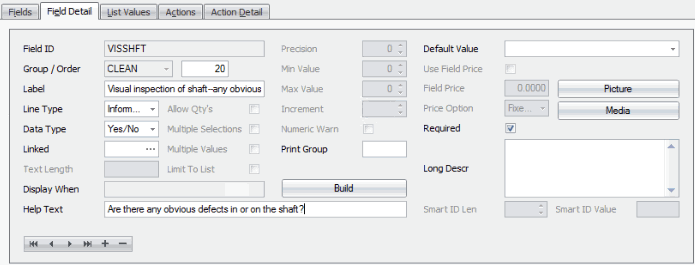
- In the Line Type field, select Information from the drop-down list. This means the answer to the question is informational only.
- To allow the user to answer 'Yes' or 'No' to the question, select Yes/No from the Data Type drop-down list.
- You can add some additional explanation for the question in the Help Text field, if necessary.
- If applicable, select a default answer in the Default Value field. A default answer value is not required.
List Values tab
Because the question is a yes or no question, the List Values tab is not applicable. Leave it blank.
Actions tab
The Actions tab creates a list of actions to be performed. Each field on the Fields tab can have one or more Actions on the Actions tab. Since a numeric response does not require any actions (additional inspection steps are added on the Fields tab), leave this tab blank.
Action Detail tab
The Action Detail tab is a detailed extension of the Actions tab. Each action on the Actions tab has one action on the Action Detail tab. If the Actions tab is blank, the Action Detail tab is not applicable.
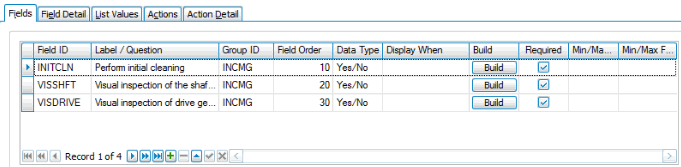
For the visual inspection of the drive gear, we have a basic inspection question.
Field tab
- Click in an empty record or use the Append button to add a new record.
- Enter a Field ID. The field ID is a short name or identifier for the question, but is not the actual label/question. If our second question is about the visual inspection of the drive gear, we can enter a field ID of VISDRIVE.
- In the Label/Question field, enter a prompt for the inspection: Are there any obvious defects in or on the shaft?
- The prompt must be answered; the user cannot skip it. Mark the Required check box to ensure the user will answer the prompt.
Field Detail tab
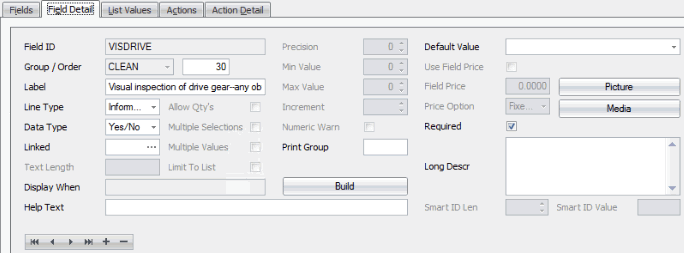
- In the Line Type field, select Information from the drop-down list. This means the answer to the question is informational only.
- To allow the user to answer 'Yes' or 'No' to the question, select Yes/No from the Data Type drop-down list.
- You can add some additional explanation for the question in the Help Text field, if necessary.
- If applicable, select a default answer in the Default Value field. A default answer value is not required.
List Values tab
Because the question is a yes or no question, the List Values tab is not applicable. Leave it blank.
Actions tab
The Actions tab creates a list of actions to be performed. Each field on the Fields tab can have one or more Actions on the Actions tab. Since a numeric response does not require any actions (additional inspection steps are added on the Fields tab), leave this tab blank.
Action Detail tab
The Action Detail tab is a detailed extension of the Actions tab. Each action on the Actions tab has one action on the Action Detail tab. If the Actions tab is blank, the Action Detail tab is not applicable.
For the visual inspection of the windings, we have a basic inspection question.
Field tab
- Click in an empty record or use the Append button to add a new record.
- Enter a Field ID. The field ID is a short name or identifier for the question, but is not the actual label/question. If our second question is about the visual inspection of the windings, we can enter a field ID of VISWIND.
- In the Label/Question field, enter a prompt for the inspection: Are there any obvious defects on the windings?
- The prompt must be answered; the user cannot skip it. Mark the Required check box to ensure the user will answer the prompt.
Field Detail tab
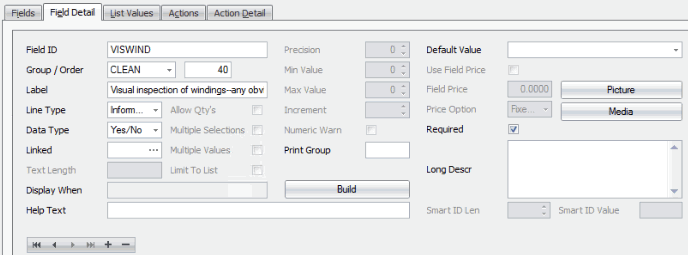
- In the Line Type field, select Information from the drop-down list. This means the answer to the question is informational only.
- To allow the user to answer 'Yes' or 'No' to the question, select Yes/No from the Data Type drop-down list.
- You can add some additional explanation for the question in the Help Text field, if necessary.
- If applicable, select a default answer in the Default Value field. A default answer value is not required.
List Values tab
Because the question is a yes or no question, the List Values tab is not applicable. Leave it blank.
Actions tab
The Actions tab creates a list of actions to be performed. Each field on the Fields tab can have one or more Actions on the Actions tab. Since a numeric response does not require any actions (additional inspection steps are added on the Fields tab), leave this tab blank.
Action Detail tab
The Action Detail tab is a detailed extension of the Actions tab. Each action on the Actions tab has one action on the Action Detail tab. If the Actions tab is blank, the Action Detail tab is not applicable.
In our example, the VSUAL group questions will be presented to the user second (Tab Order = 20). Select the VSUAL group in the Groups section.
In review:
With regard to the VSUAL group, the user performs a visual inspection:
- Inspect for cracks. Record location(s).
- Inspect for excessive wear. Record location(s).
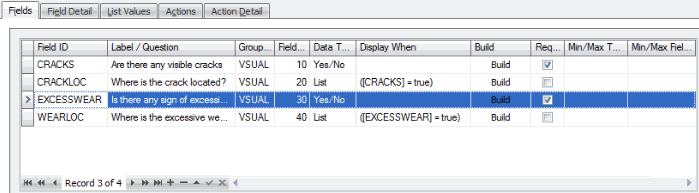
Field tab
- Click in an empty record or use the Append button to add a new record.
- Enter a Field ID. The field ID is a short name or identifier for the question, but is not the actual label/question.
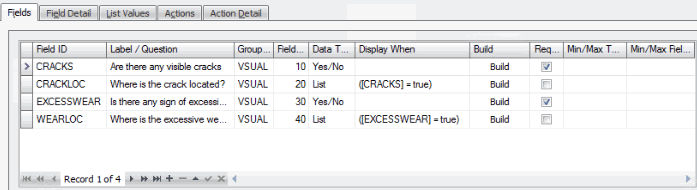
- In the Label/Question field, enter the inspection prompt the user will answer, such as: Are there any visible cracks?
- Mark the Required check box. The user must answer the question.
Field Detail tab
The Field Detail tab gives more detail about the selected field. Use the navigation buttons at the bottom of the tab to move from field to field.
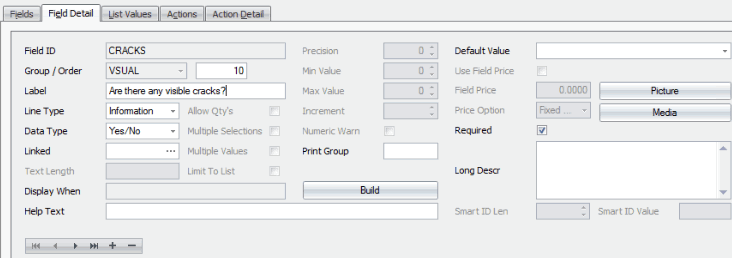
- In the Line Type field, select Information from the drop-down list. This means the answer to the question is informational only.
- To allow the user to answer 'Yes' or 'No' to the question, select Yes/No from the Data Type drop-down list.
- You can add some additional explanation for the question in the Help Text field, if necessary.
- If applicable, select a default answer in the Default Value field. A default answer value is not required.
List Values tab
Because the question is a text question, the List Values tab is not applicable. Leave it blank.
Actions tab
The Actions tab creates a list of actions to be performed. Each field on the Fields tab can have one or more Actions on the Actions tab. Since the entry of freeform text does not require any actions (additional inspection steps are added on the Fields tab), leave this tab blank.
Action Detail tab
The Action Detail tab is a detailed extension of the Actions tab. Each action on the Actions tab has one action on the Action Detail tab. Since the Actions tab is blank, leave this tab blank.
Use the Save button on the toolbar to save your changes.
If the user answers 'Yes' to the previous prompt, the user needs options to indicate the location of the crack(s).
Field tab

- Create a new record for the crack location question by clicking the Append button. This question is not required because the user will not see the question unless the value of CRACKS is 'Yes' or 'True'.
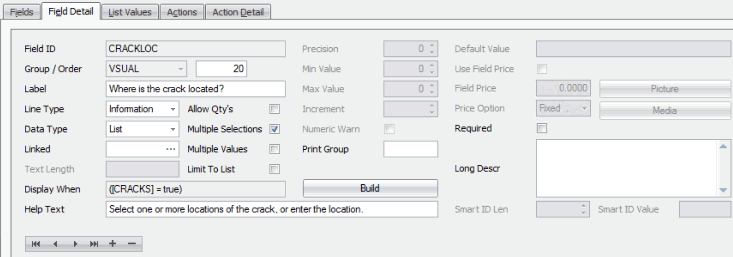
- Enter a Field ID. Our question is about the location of the crack(s), so we will enter a field ID of CRACKLOC.
- In the Label/Question field, enter the question/prompt the customer will need to answer, such as: Select the location(s) of the crack(s). We will present the user with a standard list of locations to choose from, as well as allow them to enter a location not listed.
- Each question can have only one list of options. Because we only want to display this prompt if the user answers 'Yes' to the question about visible cracks (CRACKS), we need to specify when the prompt will be displayed.
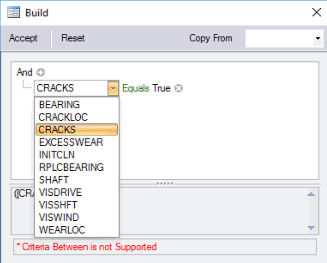
For the CRACKLOC Display When, we can specify that the prompt will only appear if the CRACKS field value equals 'True'. To build the conditional statement, click the Build button to open the Build window. You build the conditional statement like a data filter. Click the Accept button to save the condition.
If you want to use a display condition that already exists, you can choose the prompt from the Copy From drop-down list.

Field Detail tab
The Field Detail tab gives more detail about the selected field. Use the navigation buttons at the bottom of the tab to move from field to field.
- In the Line Type field, select Information from the drop-down list. This means the answer to the question is for information.
- To present a list of options to the user, select List from the Data Type drop-down list.
- The Allow Qty's check box is disabled.
- Because the user may select more than one location for any cracks they find, mark the Multiple Selections check box.
- To allow the user to enter a location not in the list, clear the Limit to List check box.
- You can add some additional explanation for the question in the Help Text field, if necessary.
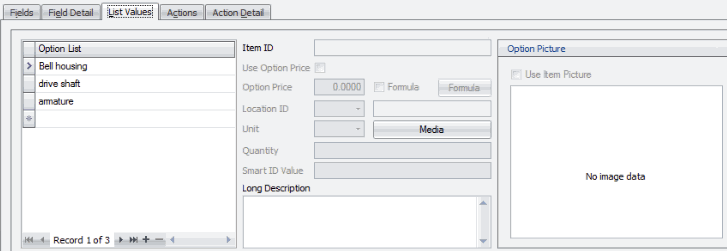
List Values tab
The List Values tab is where you create the list of options for the user if you set your Data Type on the Field Detail tab to List. If you set your Line Type on the Field Detail tab to Information, you will enter the contents of the list of options for the user.
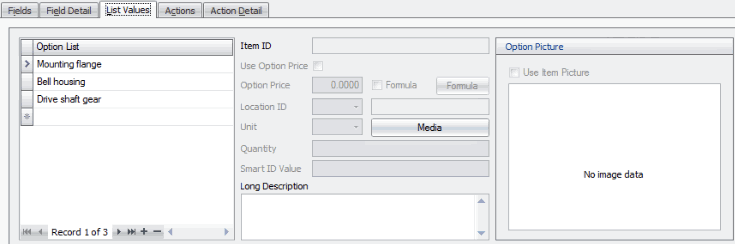
- For each option in the list, enter a location in the Option List. Use the Append button to add lines, if necessary.
- If you want to associate a media code with the item, use the Media button.
- If you want to add a picture for the option, right-click in the Image field and select Load.
- Enter a Long Description for the option, if applicable.
- Repeat Steps 1 to 4 for each option in the list.
Actions tab
The Actions tab creates a list of actions to be performed. Each field on the Fields tab can have one or more Actions on the Actions tab.
Because we do not have any additional materials or labor we need to include with the field, we have no actions to add. We can leave the Actions tab blank.
Action Detail tab
The Action Detail tab is a detailed extension of the Actions tab. Each action on the Actions tab has one action on the Action Detail tab.
Because our Actions tab is blank, the Action Detail tab is also blank.
Use the Save button on the toolbar to save your changes.
Field tab
- Click in an empty record or use the Append button to add a new record.
- Enter a Field ID for our question about excessive wear found during a visual inspection during cleaning: EXCESSWEAR.
- In the Label/Question field, enter the question the user will answer: Is there any sign of excessive wear?
- The question must be answered; the user cannot skip it. Mark the Required check box to ensure the user will answer the question.
Field Detail tab
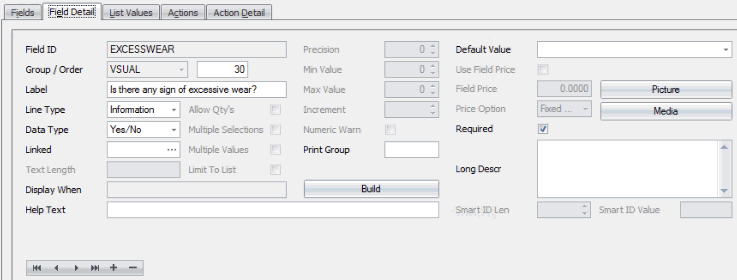
The Field Detail tab gives more detail about the selected field. Use the navigation buttons at the bottom of the tab to move from field to field.
- In the Line Type field, select Information from the drop-down list. This means the answer to the question is for information.
- To present a list of options to the user, select List from the Data Type drop-down list.
- The Allow Qty's check box is disabled.
- Because the user may select more than one location for any cracks they find, mark the Multiple Selections check box.
- To allow the user to enter a location not in the list, clear the Limit to List check box.
- You can add some additional explanation for the question in the Help Text field, if necessary.
List Values tab
Because the question is a yes or no question, the List Values tab is not applicable. Leave it blank.
Actions tab
The Actions tab creates a list of actions to be performed. Each field on the Fields tab can have one or more Actions on the Actions tab. Since this yes/no response does not require any actions (additional inspection steps are added on the Fields tab), leave this tab blank.
Action Detail tab
The Action Detail tab is a detailed extension of the Actions tab. Each action on the Actions tab has one action on the Action Detail tab. Since the Actions tab is blank, leave this tab blank.
Use the Save button on the toolbar to save your changes.
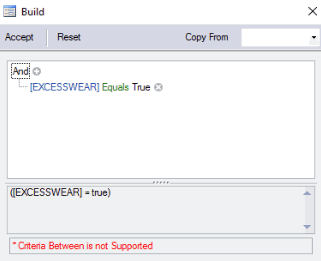
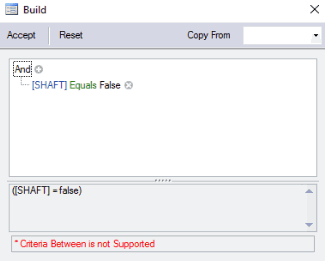
For the WEARLOC Display When, we can specify that the question will only appear if the EXCESSWEAR = 'True'. To build the conditional statement, click the Build button to open the Build window. You build the conditional statement like a data filter. Click the Accept button to save the condition.
If you want to use a display condition that already exists, you can choose the prompt from the Copy From drop-down list.
Field Detail tab
The Field Detail tab gives more detail about the selected field. Use the navigation buttons at the bottom of the tab to move from field to field.

- In the Line Type field, select Information from the drop-down list. This means the answer to the question is for information only.
- To allow the user to answer 'Yes' or 'No' to the question, select Yes/No from the Data Type drop-down list.
- Select a Default Value for the field. In our example, we will set 'Yes' as the default.
- You can add some additional explanation for the question in the Help Text field, if necessary.
List Values tab
The List Values tab is where you create the list of options for the user if you set your Data Type on the Field Detail tab to List. If you set your Line Type on the Field Detail tab to Information, you will enter the contents of the list of options for the user.
- For each option in the list, enter a location in the Option List. Use the Append button to add lines, if necessary.
- If you want to associate a media code with the item, use the Media button.
- If you want to add a picture for the option, right-click in the Image field and select Load.
- Enter a Long Description for the option, if applicable.
- Repeat Steps 1 to 4 for each option in the list.
Actions tab
The Actions tab creates a list of actions to be performed. Each field on the Fields tab can have one or more Actions on the Actions tab. Since the selection of an option on the list does not require any actions (additional inspection steps are added on the Fields tab), leave this tab blank.
Action Detail tab
The Action Detail tab is a detailed extension of the Actions tab. Each action on the Actions tab has one action on the Action Detail tab. Since the Actions tab is blank, this tab is blank.
Use the Save button on the toolbar to save your changes.
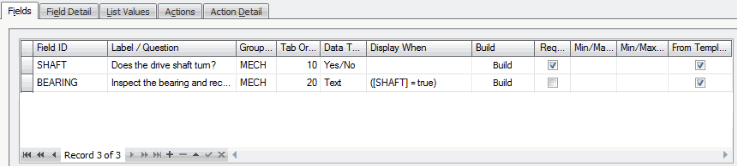
In our example, the MECH group questions will be presented to the user third (Tab Order = 30). Select the MECH group in the Groups section.
In review:
With regard to the mechanical inspection:
- Does the shaft turn freely?
- Inspect the bearing and replace if necessary.
We can include a list of options for each point of the inspection.
Field tab
Remember, you can use the Column Chooser to add columns to the grid.

- Click in an empty record or use the Append button to add a new record.
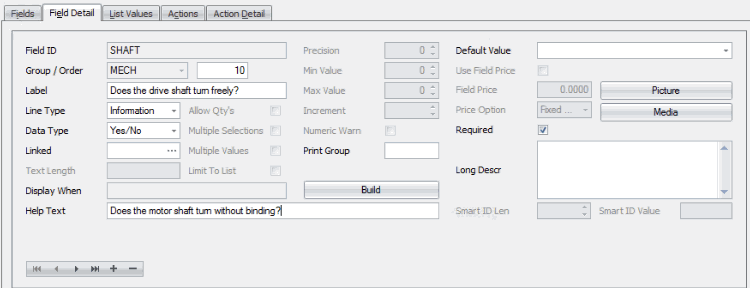
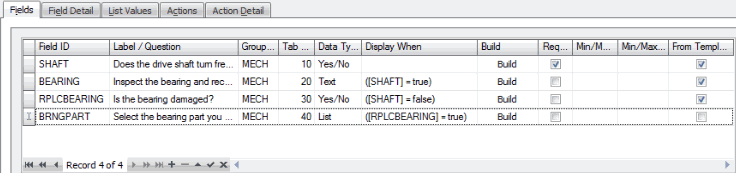
- Enter a Field ID for the first question. The field ID is a short name or identifier for the question, but is not the actual label/question. If our question is about the motor shaft, we can enter a field ID of SHAFT. In the Label/Question field, enter the inspection metric: Does the shaft turn freely?
- The question must be answered; the user cannot skip it. Mark the Required check box to ensure the user will answer the question.
- If the field deals with tolerances--minimum and maximum measurements or quantities--the process for setting up the question is a bit different. See Using Tolerances in Configurator and Inspections for more details.
Field Detail tab
The Field Detail tab gives more detail about the selected field. Use the navigation buttons at the bottom of the tab to move from field to field.
- In the Line Type field, select Information from the drop-down list. This means the answer to the question is informational only.
- To allow the user to answer 'Yes' or 'No' to the question, select Yes/No from the Data Type drop-down list.
- You can add some additional explanation for the question in the Help Text field, if necessary.
- You need to select a default answer for the question in this case. Select the default answer in the Default Value field.
List Values tab
Because the question is a yes or no question, the List Values tab is not applicable. Leave it blank.
Actions tab
The Actions tab creates a list of actions to be performed. Each field on the Fields tab can have one or more Actions on the Actions tab. Since a response of 'Yes' or 'No' does not require any actions (additional inspection steps are added on the Fields tab), leave this tab blank.
Action Detail tab
The Action Detail tab is a detailed extension of the Actions tab. Each action on the Actions tab has one action on the Action Detail tab. If the Actions tab is blank, the Action Detail tab is not applicable.
Use the Save button on the toolbar to save your changes.
If the shaft turns freely, the bearing should still be inspected for binding and wear.
Field tab
- Click in an empty record or use the Append button to add a new record.
- Enter a Field ID for the first question. The field ID is a short name or identifier for the question, but is not the actual label/question. If our question is about the motor shaft bearing, we can enter a field ID of BEARING. In the Label/Question field, enter the inspection metric: Inspect the bearing
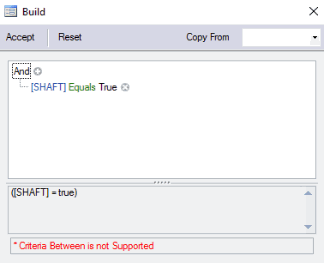
- The Display When field is optional, but this is where you can use logic to determine whether the question or label should appear. For example, if you set the Display When to [SHAFT]=TRUE, the BEARING field label/question will only display if the technician indicates the shaft turns freely.
- If you want to set up logic in the Display When field, use the Build button to open a dialog box where you can build the logic statement. The dialog box allows you to build a logic statement in the same manner as the Data Filter in Interactive Views.
If you want to use a display condition that already exists, you can choose the prompt from the Copy From drop-down list.
- If the field deals with tolerances--minimum and maximum measurements or quantities--the process for setting up the question is a bit different. See Using Tolerances in Configurator and Inspections for more details.
-
Use the Save button on the toolbar to save your changes.
Field Detail tab
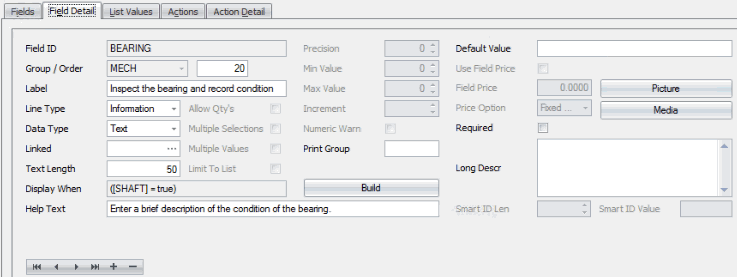
- We want the user to enter a value at the prompt.
- In the Line Type field, select Information from the drop-down list. This means the answer to the question is informational only.
- To allow the user to enter a text value, select Text from the Data Type drop-down list.
- You can add some additional explanation for the question in the Help Text field, if necessary.
- Enter the maximum length for the text entered in the Text Length field.
- If there is a default value, enter it in the Default Value field. Otherwise, leave the field blank.
List Values tab
Because the question is a text question, the List Values tab is not applicable. Leave it blank.
Actions tab
The Actions tab creates a list of actions to be performed. Each field on the Fields tab can have one or more Actions on the Actions tab. Since a text response does not require any actions (additional inspection steps are added on the Fields tab), leave this tab blank.
Action Detail tab
The Action Detail tab is a detailed extension of the Actions tab. Each action on the Actions tab has one action on the Action Detail tab. If the Actions tab is blank, the Action Detail tab is not applicable.
Field tab
- Click in an empty record or use the Append button to add a new record.
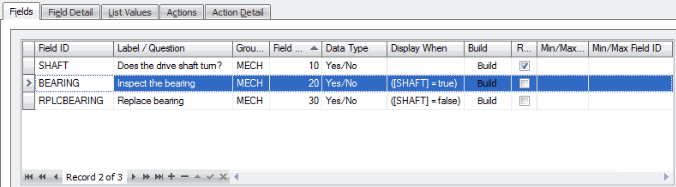
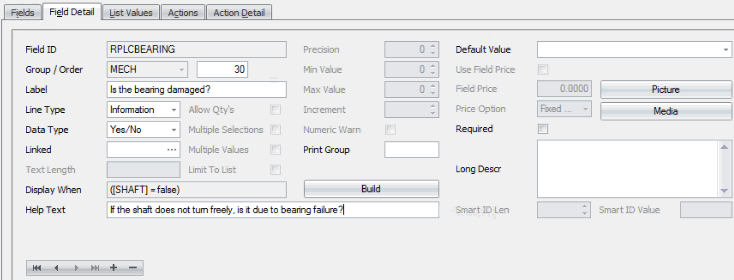
- Enter a Field ID for our question about replacing a bad bearing found during a mechanical inspection: RPLCBEARING.
- In the Label/Question field, enter the question the user will answer: Does the bearing require replacement?
- The Display When field is optional, but this is where you can use logic to determine whether the question or label should appear. For example, if you set the Display When to [SHAFT]=FALSE, the RPLCBEARING field label/question will only display if the technician indicates the shaft does not turn freely.
- If you want to set up logic in the Display When field, use the Build button to open a dialog box where you can build the logic statement. The dialog box allows you to build a logic statement in the same manner as the Data Filter in Interactive Views.
If you want to use a display condition that already exists, you can choose the prompt from the Copy From drop-down list.
Field Detail tab
The Field Detail tab gives more detail about the selected field. Use the navigation buttons at the bottom of the tab to move from field to field.
- In the Line Type field, select Information from the drop-down list. This means the answer to the question is for information.
- To allow the user to answer 'Yes' or 'No' to the question, select Yes/No from the Data Type drop-down list.
- Select a Default Value for the field. In our example, we will set 'No' as the default.
List Values tab
Because the question is a yes or no question, the List Values tab is not applicable. Leave it blank.
Actions tab
The Actions tab creates a list of actions to be performed. Each field on the Fields tab can have one or more Actions on the Actions tab. Since this yes/no response does not require any actions (additional inspection steps are added on the Fields tab), leave this tab blank.
Action Detail tab
The Action Detail tab is a detailed extension of the Actions tab. Each action on the Actions tab has one action on the Action Detail tab. Since the Actions tab is blank, leave this tab blank.
Use the Save button on the toolbar to save your changes.
If the user answers 'Yes' to the previous prompt, the user needs options to indicate the replacement bearing part number. Notice in the example that the From Template check box is blank. This means the field was entered as part of this configuration, and does not exist on the template. If you clear a From Template check box, it disconnects that field from the template so when changes are made to that field on the template, the disconnected field on this configuration will not be updated with those changes.
Field tab
- Create a new record for the bearing replacement question by clicking the Append button. This question is not required because the user will not see the question unless the value of RPLCBEARING is 'Yes' or 'True'.
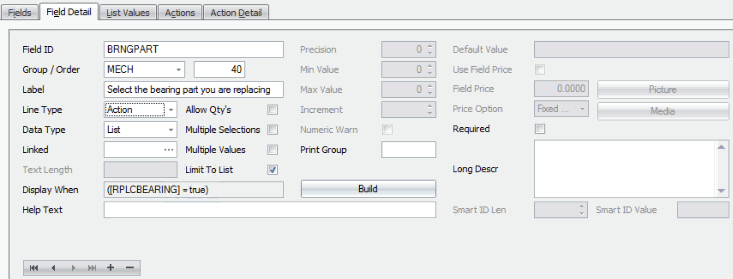
- Enter a Field ID. Our question is about the part number of the bearing, so we will enter a field ID of BRNGPART.
- In the Label/Question field, enter the question/prompt the customer will need to answer, such as: Select the replacement bearing part number. We will present the user with a standard list of part numbers to choose from, and tie those options to inventory items.
- Each question can have only one list of options. Because we only want to display this prompt if the user answers 'Yes' to the question about replacing the bearing (RPLCBEARING), we need to specify when the prompt will be displayed.
For the BRNGPART Display When, we can specify that the prompt will only appear if the RPLCBEARING field value equals 'True'. To build the conditional statement, click the Build button to open the Build window. You build the conditional statement like a data filter. Click the Accept button to save the condition.
If you want to use a display condition that already exists, you can choose the prompt from the Copy From drop-down list.

Field Detail tab
The Field Detail tab gives more detail about the selected field. Use the navigation buttons at the bottom of the tab to move from field to field.
- In the Line Type field, select Action from the drop-down list. This means the answer to the question will determine an action the technician will take, such as replacing a part.
- To present a list of options to the user, select List from the Data Type drop-down list.
- To prevent the user from entering a part not in the list, mark the Limit to List check box.
- The Allow Qty's check box is disabled.
- You can add some additional explanation for the question in the Help Text field, if necessary.
List Values tab
The List Values tab is where you create the list of options for the user if you set your Data Type on the Field Detail tab to List. If you set your Line Type on the Field Detail tab to Action, you will enter the contents of the list of options for the user.
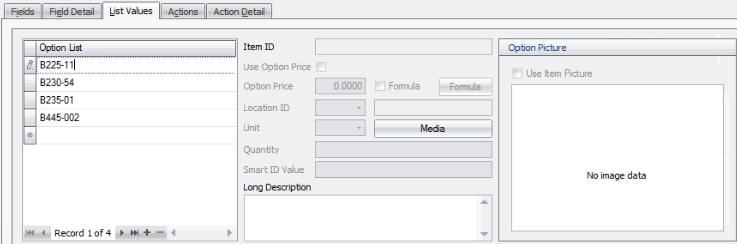
- For each option in the list, enter a part number in the Option List. Use the Append button to add lines, if necessary.
- If you want to associate a media code with the item, use the Media button.
- If you want to add a picture for the option, right-click in the Image field and select Load.
- Enter a Long Description for the option, if applicable.
- Repeat Steps 1 to 4 for each option in the list.
Actions tab
The Actions tab creates a list of actions to be performed. Each field on the Fields tab can have one or more Actions on the Actions tab.
Because we have additional materials and/or labor we need to include with the field, we have actions to add. For each part number, there will be an action item.
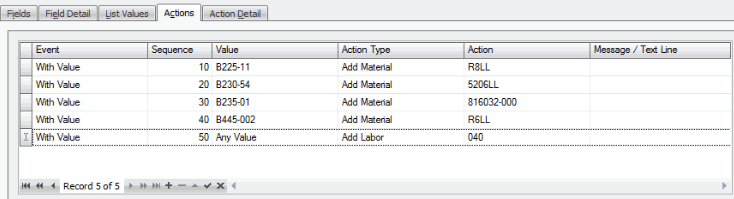
For each part number in the option list, we will create an action record:
- Enter an Event record: choose 'With Value' from the drop-down list. This means the action is dependent on a specific value, the part number selected in the Option List. Use the Append button to add lines, if necessary.
- Select a Value from the drop-down list. The action will take place when the selected value is chosen from the option list. There should be one action record for each part number in the option list. If the action should be performed no matter what option is selected from the list, choose 'Any Value' from the drop-down list.
- Select an Action Type of 'Add Material' if you are adding an item from inventory. If you are adding labor, select an Action Type of 'Add Labor'.
- If the Action Type is 'Add Material', select an inventory item from the Action drop-down list. If the Action Type is 'Add Labor', select a labor code from the drop-down list.
- Repeat Steps 1 to 4 for each option in the list.
Action Detail tab
The Action Detail tab is a detailed extension of the Actions tab. Each action on the Actions tab has one action on the Action Detail tab.
Because our Actions tab contains items and labor, the Action Detail tab allows us to add additional information about the item or labor.
Item

For each Add Material action:
- Accept or select an inventory Location ID for the item.
- You can optionally select a work type for the action from the Sched Work Type drop-down list.
- If applicable, select a Vendor ID for the item from the drop-down list.
- If you want to override the price for the item, mark the Use Override Price check box and enter an Override Price.
- Alternately, if you mark the Use Override Price check box, you can enter a formula to use to calculate the price by marking the Formula check box and clicking the Formula button.
- Accept or edit the Quantity of the item.
- Accept or edit the Unit of measure of the item.
- Enter any Notes for the action.
Labor

For each Add Labor action:
- Accept or edit the Quantity of the labor code units.
- If you want to override the price for the item, mark the Use Override Price check box and enter an Override Price.
- Alternately, if you mark the Use Override Price check box, you can enter a formula to use to calculate the price by marking the Formula check box and clicking the Formula button.
- Enter any Notes for the action.
Use the Save button on the toolbar to save your changes.
Once you finish configuring the inspection, use the Validate button on the toolbar to validate the configuration. You will get a notification window listing corrections, if any, that you need to make before the configuration is valid. Once the corrections, if any, are complete, a window will appear to notify you the configuration has been validated.
SAVE the configuration.
Once you have set up the configuration, you need to tie the inspection to a job type. Once you have a job type tied to that inspection, when you create a service repair transaction using that job type, the inspection is available.
Open the Inspection Default screen from the Service Repair | Inspections menu. Use the Full Expand or Full Collapse button on the toolbar to expand or collapse the groups in each inspection configuration.

- Use the New button on the toolbar to add an inspection to the job type.
- Select the Job Type with which you want to associate the inspection configuration. Save your changes.
- Select an inspection Configuration Description from the drop-down list.
- Select a Customer ID if you want to associate the inspection to a particular customer. This allows you to assign different inspections for different customers for the same job type.
- Click on the plus sign or use the Full Expand button on the toolbar to expand the inspection and show the Group Codes for the inspection.
- If applicable, select a user to Assign To the inspection group.
- Repeat steps 1 through 6 for each inspection you want to associate with the job type.
- Save your changes.
Once you have configured your inspection and associated it with a job type, it's a good idea to create a service repair order using the job type to make sure it behaves in the way you expect.
To create a new service repair order:
- Open the Job Transactions function from the Service Repair | Transactions menu.
- Click the New button on the toolbar to open a blank job transaction record.
- Accept or edit the Transaction Type.
- Select a Customer ID from the drop-down list.
- Select a Department from the drop-down list.
- Select the Job Type to which you just associated the inspection configuration from the drop-down list. The system will auto-create the inspection(s) tied to the selected job type.
- Accept or edit the customer Contact, as necessary.
- Enter a Job Description for the transaction.
- Save your changes.
To view the inspections for a job transaction:
- Open the Inspections screen from the Service Repair | Inspections menu.
- Use the Data Filter to select the range of filtering options or leave the filter blank to include all available data. Click the Apply Filter button to view a list of jobs that match the criteria.
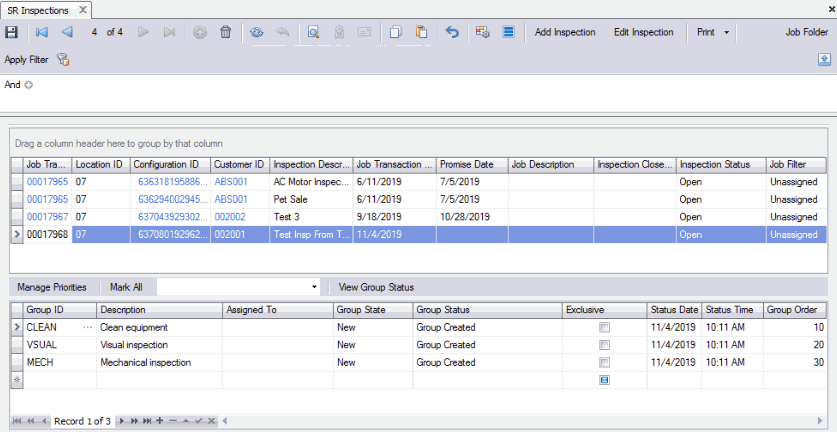
The upper grid of the screen shows the Job Transactions that meet the filter criteria. If the job transaction (job type) has more than one inspection associated with it, each inspection will appear as a separate record.
The lower grid shows the group codes of the selected inspection for the job transaction.
- You can add an inspection to a job transaction by using the Add Inspection button on the toolbar.
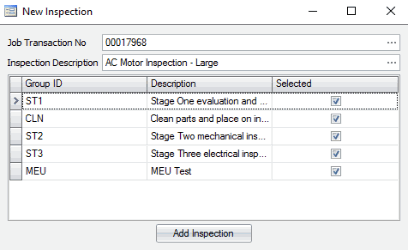
- Select a job transaction to which you want to add an inspection from the Job Transaction No drop-down list.
- Select the inspection to add to the job from the Inspection Description drop-down list.
- Select one or more groups to include in the inspection by marking the Selected check box for the group.
- Press the Add Inspection button to create a new inspection record for that job.
- To mark an inspection group as completed, select the inspection group in the lower section of the screen, then in the Group State column, select the appropriate state from the drop-down list. To mark all groups with the same state at once, select a Group State from the drop-down list on the toolbar, then click the Mark All button.
- To manage the priorities of inspections, click the Manage Priorities button on the toolbar to open the Manage Priorities screen.
- If you want to assign more than one individual to an inspection group, use the Append button to add another record with the group and select a user from the Assigned To drop-down list.
- To perform an inspection for a job, select Inspections from the Mobile Service Repair main menu on your mobile device. See Inspections for more information. Make sure you test each of the conditions to verify you have set up the inspection the way you intended.
- To edit the values/answers on an inspection, in the Inspections function, use the Edit Inspection button to edit the answers/values for an inspection. See Edit Inspection for more information.