Traverse Global v11.2 - Service Repair
Walk-Through
This section will walk through the workflow from entering a new job transaction to creating the invoice and closing the job transaction. This is the most basic process, and does not go into more complex scenarios.
By default, a new job transaction is created as an estimate job. You can change this to a quote or an approved job when you start a new job transaction. The differences are:
- An estimate job allows you to calculate the approximate cost of the repair. When the customer approves the repair, you can convert it directly into an approved job. You cannot bill an estimate job.
- A quote allows you to calculate the costs of a proposed repair. If the customer approves the repair, the quote information is transferred to a new job transaction as either an estimate job or an approved job. You cannot consume labor or materials to a quote.
- If the customer pre-approves the repair, you can enter the job transaction as an approved job.
The advantage of creating an estimate job for each job transaction is that you can later compare the calculated costs of the job transaction to the actual costs when the approved job is complete. This information can help you give your customers more accurate estimates, and allows you to adjust schedules, standard work times, and inventory to meet customer demands.
Basic Scenario:
A customer brings an A/C motor to your shop for repair.
Create the Job
- Open the Job Transactions function.
- Select the New Record button on the toolbar to start a new job transaction.
- If your system automatically generates transaction numbers, the Transaction No field will populate. If you create transaction numbers manually, enter a Transaction No.
- The Transaction Type field will be set to 'Estimate Job'.
- Select the customer in the Customer ID drop-down list. For our example, we are selecting ACS Technologies in our sample database.
- Select a department for the repair in the Department drop-down list. For this example, we will select AC (AC Motor Repair) for the department
- Select a Job Type from the drop-down list. A job type is a standard template that includes Promise Days, Work Type, Estimated Hours for the work, Nameplate Fields, and other information. A job type represents the type of work your shop performs for customers. For this example, we will select the AC MOTOR job type from the sample database.
- If the Contact field is empty, or the person listed is not the contact person for this job transaction, enter the name of the contact person.
- Enter a Job Description.
- Select a Batch Code, if applicable.
- The Invoice From, Entered By, Fiscal Period/Year, Currency ID, Days Quote Valid For, and Trans Date fill automatically. You should not need to change any of these values.
- If the customer provides you with a purchase order number, enter it in the Cust PO # field. Enter any applicable numbers into the PO Release # and/or Misc # field(s), as necessary.
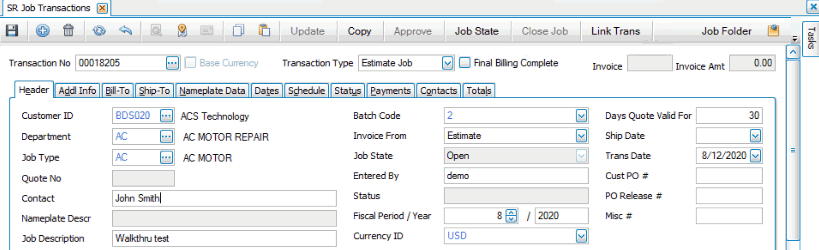
Save the job transaction to this point using the Save button.
- The Location ID field should be populated. Accept or select a location ID from the drop-down list.
- Enter a location in the Shop Location field, as applicable.
- Since this is a basic scenario, we will not mark any of the check boxes. See the Job Transactions topic for more information about the check boxes.
- Since we do not yet know if we will have to replace the entire motor, leave the Replacement Item, Replacement Price, and Replacement Descr fields blank.
- Because we have not yet analyzed the motor, leave the Failure Code fields blank.
- We have not lost the repair job yet, so leave the Lost Reason Code field blank.
- If you have any comments about the job, enter them into the Sales Rep Notes field.
- Printing Options: You can select the type of pricing information that appears on the Estimates, Quick Delivery Tickets, Invoices, and Delivery tickets by selecting the options for Labor, Materials, Other, Text, Print Subtotals, and Print Totals for those documents . The default values for the fields comes from the Department screen.
For Labor, Material, and Other values:
Value Will Print Detail Item ID, Description, Additional Description if checked, Unit, Quantity, Unit Price, and Extended Prices for each line item. OT, DT, and REG time will print on separate lines Line Descriptions with Extension Item ID, Description, Additional Description if checked, Extended Price Line Descriptions Only Item ID, Description, Additional Description if checked Hide (Include Price) Do not print line items, but include it in the total and the subtotal price Exclude (Do Not Include In Price) Do not print line items, and do not include it in the total or the subtotal price - For Text values, select Yes to print the text; otherwise, select No.
- For Print Subtotals, select Yes to print the subtotals; otherwise, select No.
- For Print Totals, select Yes to print the totals; otherwise, select No.
See the Form Printing Options topic for more information.
- If the customer left any special instructions for the job, enter them into the Special Instructions field.
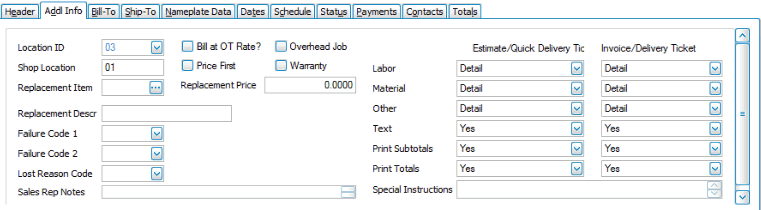
Save the job transaction to this point using the Save button.
The Bill-To information comes from the customer file. The values in these fields should not need to be changed, unless the sales rep ID and/or commission percentage needs to be edited. Edit the Sales Rep ID field(s) and/or the Percent field(s), if necessary. Any changes made to those fields will apply only to this job transaction.
If you want to select a Customer Level, choose a level from the drop-down list.
Accept or edit the Dept Distribution code and/or the Cust Distribution Code, as applicable. Any changes made to these fields will apply only to this job transaction.
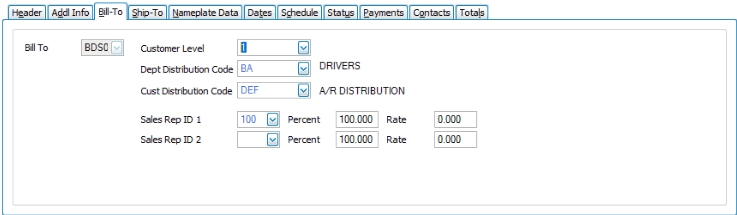
Save the job transaction to this point using the Save button.
If the customer will pick the motor up once your shop has completed the repairs, you do not need to fill out this tab. If you will be shipping the repaired motor back to the customer, select a Ship-To ID from the drop-down list. The name and address fields should populate. You may see a pop-up dialog asking if you want to assign information (tax location, sales rep information, distribution code) from the Ship-To Address. Mark the applicable check box(es), if any, then click OK.
If the customer has requested a particular ship method, select the option from the Ship Method/Via drop-down list.
Once you ship the motor, you can enter the tracking number for the shipment in the Ship Number field. Leave it blank for now.
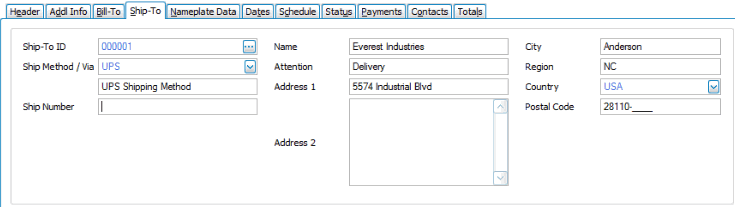
Save the job transaction to this point using the Save button.
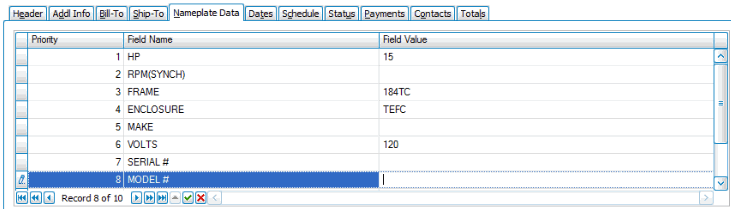
You should be able to find this information on the motor. For each Field Name as applicable, enter or select the Field Value from the motor’s data plate.
Save the job transaction to this point using the Save button.
The date fields fill in automatically when certain actions are taken in other functions, except for the Estimate Complete field. Since the estimate job is not yet complete, leave the field blank. When you complete the estimate job, click the Est Complete button on the detail menu bar to fill in the Estimate Complete field.

Save the job transaction to this point using the Save button.
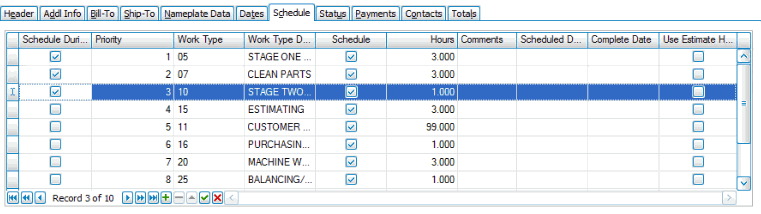
You can edit the Schedule check box, the Comments field, and the Scheduled Date field. The Complete Date and 1st Labor Date fields are updated through the system. See the Job Transactions topic for more information.
Save the job transaction to this point using the Save button.
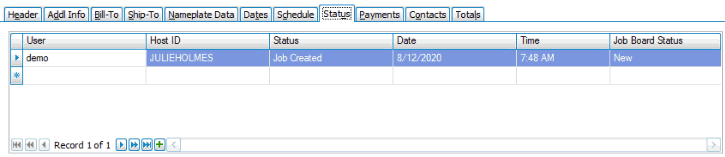
The fields on this tab are updated automatically as actions are taken on the Job Transaction.
Save the job transaction to this point using the Save button.
If you have the Traverse Payment System (TPS) functionality activated, use the Payments button in the toolbar to enter a credit card payment.
Review and/or enter external payment information for the customer. If the customer's Payment Method ID on the Defaults tab is set to an external payment processor, saved credit card information will appear in the External Payments screen for the customer.
Note: You cannot add, edit, or delete external CC payment information in the detail grid. You must use the Payments button on the toolbar to open the External Payments screen to perform these actions. However, if you have an EMV (card reader) device available, you can use it to enter a new card when the Use New Card check box is marked.
See the TPS Overview for more information about external payments, as well as some examples.
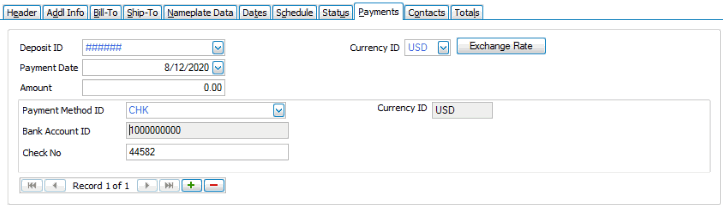
You may enter payments for payment methods that do not use the external payment system.
- If the customer submits a prepayment, add it to this tab by clicking on the Add Record button to open a blank record.
- Select a Deposit ID for the batch from the drop-down list, if necessary. Typically, you will not need to change this value.
- The Payment Date is populated with the current date. Edit the date, if necessary.
- Your company’s functional currency appears in the Currency ID field. If you use multicurrency, you may choose to change the exchange rate. Use the Exchange Rate button to do so.
- Enter the amount the customer is prepaying in the Amount field.
- Select the method the customer used to pay in the Payment Method ID drop-down list. The other fields available will change depending on the payment method.
- Enter the information in the additional fields as required. In our example, the customer is paying by check, so the Bank Account ID field, and the Check No field require values.
Save the job transaction to this point using the Save button.
The Contacts tab shows the contacts, if any, for the customer from the Contact Defaults tab of the Customer maintenance screen. This allows you to select different contacts for different document types. If the customer has no default contacts available, you can enter a contact for a document type. Any changes you make to a contact will affect only the current transaction.
- Click the Append button to add a new contact, or select a contact to edit.
- Select a Document Type to associate with the contact.
- Select or enter a Contact Name for the document type. If there is a value in the Job Type field, this contact will be associated with the selected job type for the document type.
- Select a Contact Type. This is the contact method for the document type.
- Enter or make changes to the Contact Description.
- Enter or make changes to the customer’s contact information in the Value field. This value should match the type of contact, i.e. an email address for an email type or a phone number for a phone type.
- Click the End Edit button (
 ) when you are finished.
You can remove a contact default record by selecting the record, and then using the Delete button ( ).
).
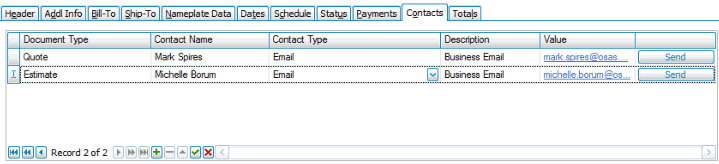
- If the Contact Type is 'Email', you can use the Send button to send an email to the customer that includes a PDF version of the selected document type. This will also save a copy of the PDF to the Job Folder. You can set the default job folder location in the Service Repair business rules.
- If the Contact Type is not "Email", you will get a notification message stating the contact is not valid for sending email.
- After you send a document, the Status field for the transaction will state the document type has been sent for the job.
- You cannot send a document that is not appropriate for the transaction status. For example, you cannot send a Delivery Ticket if the transaction status is 'Quote'.
Save the job transaction to this point using the Save button.
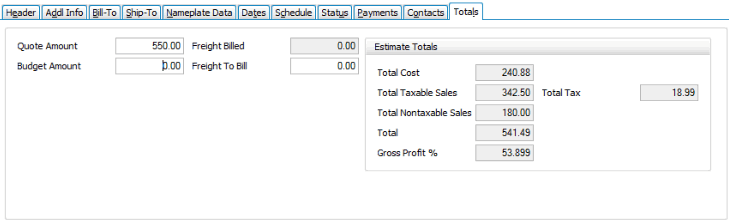
If the job transaction is created from a quote, the Quote Amount will populate. You can enter a quote amount, but it is not required.
Enter a Budget Amount, if you wish. This field is not required.
Leave the Freight to Bill field blank. You can enter a value here when you ship the motor.
Save the job transaction to this point using the Save button.
Add Inspection(s) to the Job
You can add inspections to a job as needed by using the Inspections function. For more information about inspections, see the SR Inspection Tutorial Knowledge Base document.
Add Line Items
Use the Toggle button ( ) to switch between grid (summary) view and field (detail) view.
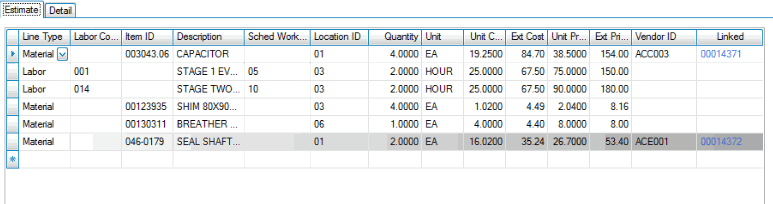
On the Estimate tab, add line items for the materials and labor you determine you’ll need for the repair. You can do this per line, or you can use the Quick Entry function to add multiple item and labor lines at once. For our example, we will use Quick Entry.
- Click the Quick Entry button on the Detail menu bar.
- On the Quick Entry screen, select a line type from the Detail Type drop-down list. The selection list will change depending on the line type you select. For our example, let’s choose the Labor lines first.
- Mark the check box next to each selection you want to add to the job transaction. Once you have selected the lines you want to add to your estimate, click the Move button. The selected items now appear in the lower part of the screen.
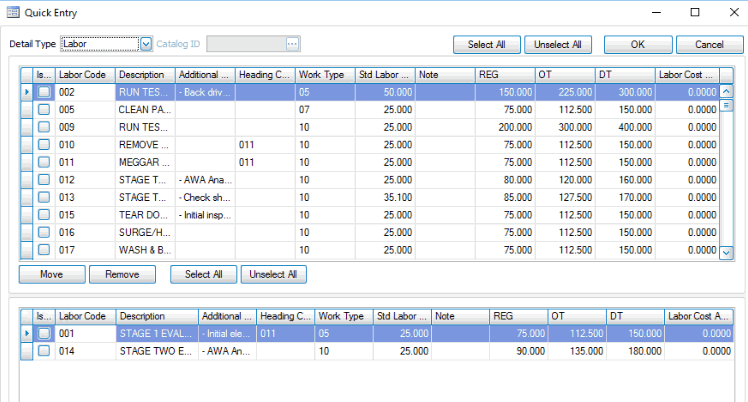
- Add those lines to the estimate job by clicking the OK button. This also closes the Quick Entry screen.
- Reopen the Quick Entry screen. Select 'Material' for the Detail Type. The upper part of the screen changes to reflect material items.
- The Catalog ID field is also now available. A catalog is a way to group Items. If there is a catalog that contains the parts you need, select it from the Catalog ID drop-down list.
- Mark the check box for each item ID you wan to add to the estimate job. Once you have selected the line item IDs you want to add to your estimate job, click the Move button. The selected item IDs now appear in the lower part of the screen.
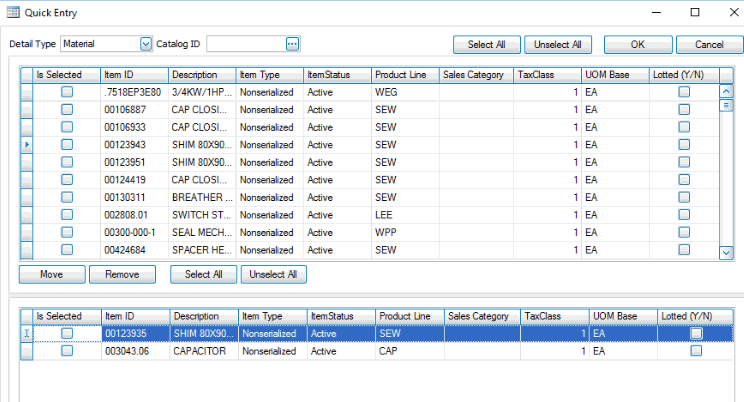
- Add those line Item IDs to the estimate job by clicking the OK button. This also closes the Quick Entry screen.
- Click the Save button in the toolbar to save the job transaction.
Note that you can apply labor and material parts to an estimate job. If, as part of the process of generating an estimate job, your technicians do work to the motor, such as initial disassembly or cleaning, you can use the Time Clock or Time Card functions to apply that labor to the job transaction.
As you discover you need additional labor or materials, you can add them on the Estimate tab by clicking in an empty record at the end of the list and selecting or editing each value as required.
Once you’ve added all the material parts and labor you think you will need, your estimate for the job transaction is now complete. You have selected the customer, department, and job type. You have selected shipment information if needed, entered the nameplate data, and recorded any prepayments the customer may have given to you. You have added the labor and materials you will need for this job transaction. Finally, you saved the information. Print a copy of the estimate for your customer by clicking the Print button on the toolbar and selecting 'Estimate'.
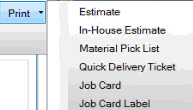
This is also where you can select to print In-House Estimates, Material Pick Lists, Quick Delivery Tickets, Job Cards, and Job Card Labels.
Submit the estimate to the customer. Once the customer approves the estimate, you can convert the estimate job to an approved job:
- Open the job transaction by selecting the estimate job from the Transaction No field.
- Click the Update button on the toolbar.
- Click the Approve button on the toolbar. A notification pop-up window will appear asking if you want to Approve the Estimate. Click Yes to approve it.
Save the job transaction to this point using the Save button.
As you work through disassembly and diagnosis of a piece of equipment, and as you perform repair work, additional materials need to be applied to the job transaction. You can add material parts to the job transaction directly from purchase orders or through material charges.
Save the job transaction to this point using the Save button.
You can order stock or non-stock items for a particular job transaction. If a purchase order item is linked to a job transaction, when the item is received, it can be issued directly to the Job Transaction. A link between a Job Transaction and a Purchase Order can be generated from the Purchase Order or from the Job Transaction.
Note: To allow this functionality, the Purchase Order Business Rule must be set to Requisitions, Purchase Order, or Choice.
- Open the job transaction in the Job Transactions function.
- Click the Update button on the toolbar to unlock the fields.
- In order to generate a purchase order or purchase requisition from the item line, you must select a Vendor ID. Ensure there is a vendor ID selected on that item’s line.

- Click the Save button in the toolbar, to save any changes you have made.
- Click the Req button on the menu bar. The Generate PO window will appear.
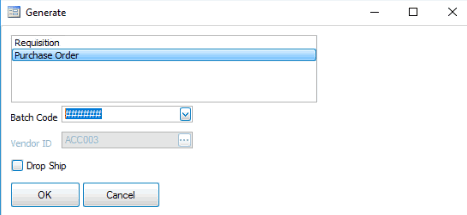
- Select to generate a requisition or a purchase order, as necessary.
- Select a Batch Code from the drop-down list if you are generating a purchase order.
- If the item will be drop shipped, mark the Drop Ship check box.
- Click OK to finish the process. A notification dialog box will appear when the process is complete.
- The purchase orders or requisitions are generated by vendor ID. Each will be presented in the Generate PO window in turn.
- The Linked field will be populated once a purchase order or requisition exists for a material line.

- Open the Purchase Order Transactions function.
- To link an existing PO to a job transaction, select a Transaction No from the drop-down list. Click the Update button on the toolbar to unlock the fields.
- To generate a new purchase order, select the New Record button on the toolbar.
- If necessary, select the Batch Code, Vendor ID, and Location ID for the purchase order.
- Add the item(s) you wish to link to the job transaction.
- Once you Save your changes, click the Source Link button on the detail menu bar to open the Transaction Link window.
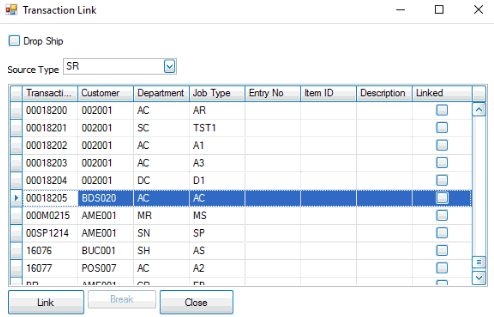
- Select 'SR' from the Source Type drop-down list.
- A list of job transactions will appear. Select the job transaction to which you want to link the item.
- If the item will be drop shipped, mark the Drop Ship check box.
- Click the Link button to finish the process. A notification dialog box will appear when the process is complete.
- The Linked check box will be marked on the PO transaction for the item.

- Open the Purchase Order Requisitions function.
- Mark the Selected check box for the requisitions from which you want to generate purchase orders. To review the linked information, click the Source Link button on the toolbar.
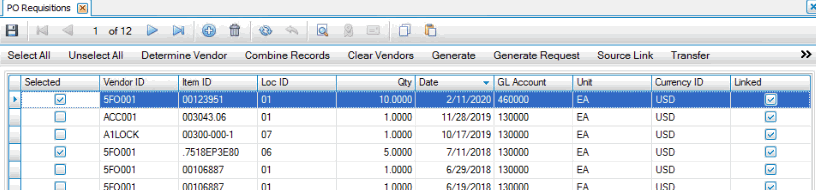
- Click the Generate button on the toolbar to create a live purchase order for each selected item. A Generate Transactions pop-up window will appear. Select a Batch Code from the drop-down list, then click OK.
- A notification dialog box will appear when the process is complete.
- Open the Purchase Order Transactions function.
- Select the purchase order you will receive against. Click the Update button on the toolbar to unlock the fields.
- Use the Receipts/Invoices button on the menu bar to open the Receipts window.
- Select the New Record button on the toolbar to enter a new receipt.
- Enter a Receipt No.
- Edit the Date and Fiscal Period/Year as necessary.
- In the Entry No field, select the item you want to receive from the drop-down list.

- Edit the quantity of the item received in the Qty field, if necessary.
- Click the Save button in the toolbar to save any changes you have made.
- Close the Receipts window to return to the Purchase Order Transaction screen.
- The item is now received against the linked job transaction.
- Open the Job Transactions function.
- Select the job transaction linked to the purchase order you received. Click the Update button on the toolbar to unlock the fields.
- Once you unlock fields, you will receive a notification that Linked Quantities have been updated. Click OK to close the notification dialog box.
- The Estimate tab on the lower portion of the screen will now list the linked item(s) you have received.
Print Material Pick Lists
Use the Print Material Pick List function to print a list of materials needed to complete the work for a job transaction.
- Open the Print Material Pick List function from the Service Repair Transaction Journals menu.
- To include additional descriptions on the material pick list, mark the Additional Descriptions check box.
- Select the batch(es) to print. Use the All button to select all batches, or the None button to clear all the check boxes.
- Use the command buttons on the toolbar to Print, Output (save), Preview, or Reset the field values.
Print Job Cards
Use the Print Job Cards function to print QA job cards for a job transaction.
- Open the Print Job Cards function from the Service Repair Transaction Journals menu.
- Select a job transaction from the Transaction ID drop-down list.
- Select the type of Job Cards to print:
- Select 'Job Card QA' to print the default QA job card in Traverse.
- Select 'Excel QA Worksheets' to open Excel and print the job worksheet(s) for the selected job transaction.
- Mark the Additional Description check box to include additional descriptions on the Job Cards.
- Use the command buttons on the toolbar to Print, Output (save), Preview, or Reset the field values.
Material Charges
Use the Material Charges function to capture materials used for a job transaction. You can also use the Material Charges function to apply credit to the job transaction for material you included on the job transaction, but didn’t use.
Tip: Use the Quick Entry option to view the items already on the estimate job.
To add Material Charges or apply Material Credit to the job, follow these steps:
- Open the Material Charges function from the Service Repair Transactions menu.
- Select a job transaction from the Job Transaction ID drop-down list.
- To add material charges or credits, select the New Record button on the toolbar.
- Select a Line Type from the drop-down list.
- Select an Item ID from the drop-down list, or enter an item ID for a non-inventory item.
- Edit the Location ID and Unit, if necessary.
- Enter the Quantity of the item.
- Edit the Unit Price, if necessary.
- Enter a Reference value, if applicable.
- To apply the material charges and/or credits to the job transaction, click the Write button on the toolbar. To wait to apply material charges, click the Save button in the toolbar then use the Write button once you have added all the material charges.
Note: The additional material charges will appear on the Detail tab on the Job Transaction screen. They will not appear on the Estimate tab.
Labor for the Job
As you work through disassembly and diagnosis of a piece of equipment, and as you perform repair work, you can add labor to the job.
Time Clock
Enter Time Clock information for Job Transactions using the Time Clock function.
- Open the Time Clock function from the Service Repair Transactions menu.
- Select an employee from the Employee ID drop-down list.
- Select a Schedule IDfrom the drop-down list.
- If you are starting a job, select 'Start Job' as the Entry Type. If you are closing a job and not starting another one, select 'Close Job' as the Entry Type.
- Select the Job Number from the drop-down list.
- Select the Labor Code to which you want to apply the labor time.
- Click the Add Job button on the toolbar.
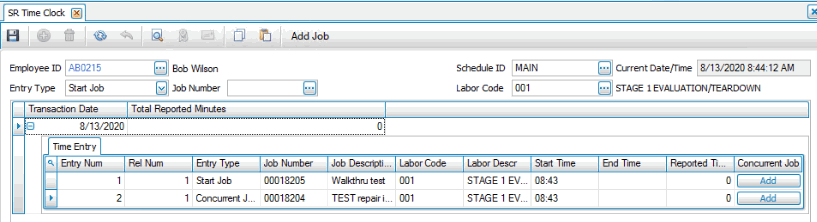
When you clock into the next labor code for the job, you may get a notification message asking if the work type is complete for the job. This will happen when you clock out of a work type that exists on the job transaction. Answer the question as required: if the work type is complete, click Yes; otherwise, click No.
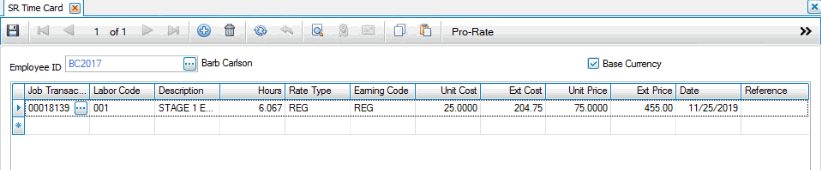
Time Card
Use the Time Card function to enter or edit time card information for employees before the house are posted.
- Open the Time Card function from the Service Repair Transactions menu.
- Select an employee from the Employee ID drop-down list.
- Select the New Record button on the toolbar to add a new time record.
- Select a Job Transaction ID from the drop-down list.
- Select a Labor Code from the drop-down list.
- Enter the number of Hours for the labor code.
- Select a Rate Type for the hours from the drop-down list.
- Select an Earning Code from the drop-down list.
- Edit the Unit Cost, Unit Price, or Date, if necessary.
- Enter a value into the Reference field, if applicable.
- Click the Save button in the toolbar to save any changes you have made.
Keep an eye on job progress
Use these tools to monitor jobs:
- Job Tracking View: Use the Job Tracking View function to follow the progress of a job transaction through to completion. You can view the job status, the last work type completed on the job transaction, the current work type, and the next work type for the job transaction, along with the associated dates. You can also see the percentage of the job that is complete.
- Service Repair Dashboards: Use the Service Repair Dashboards to get a quick overview of active job transactions, job estimate to actual variance, and job tracking.
Update the Job Schedule
When work types are completed, use the Update Job Tracking function.
- Open the Update Job Tracking function from the Service Repair Scheduling menu.
- Select a Job Transaction ID from the drop-down list. The work types assigned to the job transaction job type will appear.
- Note: The job type assigned to a job transaction must have work types listed on the Schedule tab in the Job Type Codes maintenance function in order for them to appear in the grid.
- If necessary, edit the Complete Date.
- For each Work Type you want to mark completed, select the check box in the Select column. Notice that if you answered 'Yes' to the notification prompt in the Time Clock entry screen about work type completion, those work types are already marked complete.
- Click the Schedule button on the toolbar. A notification dialog box will appear when the update is complete. The complete date for the selected work types will be set to the date appearing in the Date field.
- Note: If the complete date for a selected work type is not blank when the Schedule button is clicked, the complete date will be cleared.
Additional Job Processes
- Quality Assurance: Use the Job Card QA Entry function to record inspection and testing data for a job transaction’s work types.
- Print Quick Delivery Tickets: When the work is complete, use the Print Quick Delivery Tickets function to print the quick delivery tickets for billing transactions. You might use a quick delivery ticket when you want to get a repaired motor out the door quickly. You may not have created an estimate job with material and labor lines because the repair was brought in and returned so quickly.
- Print the Time Clock and Time Card Journals: Use the Time Clock Journal and Time Card Journal to calculate and view employee hours. Print the journals before you post transactions to verify your entries.
- Post Time Clock Entries: Use the Post Time Clock Entries function to post hours calculated from time clock entries. Note: Hours from closed or on-hold job transactions will not be posted. Re-open or release the job transaction to post hours for the job.
- Print the Material Charges Journal: Use the Material Charges Journal to calculate and view material charges for job transactions. Print the journal before you post transactions to verify your entries.
- Post Transactions: When you Post Transactions, the system updates job transaction history for the job transactions that are being closed.
Billing Process
- Prepare Billings: Prepare Billings for a group of approved jobs that are open. This will bill your customers for the work done and parts used on job transactions.
- Edit Billings: If necessary, you can use the Edit Billings function to make adjustments to the billings before printing delivery tickets or invoices. You can also print delivery tickets and invoices from the Edit Billings function.
- Print Delivery Tickets: Use the Print Delivery Tickets function to print delivery tickets for billing transactions.
- Print Invoices: Use the Print Invoices function to print invoices for billing transactions.
- Print the Daily Sales Tax Journal: Print the Daily Sales Tax Journal for an additional audit trail. The Daily Sales Tax Journal shows taxes collected and owed and is organized by tax location.
- Print the Billing Journal: Print the Billing Journal as part of your audit trail for billing transactions. If you have used the Edit Billings function to make changes to billing transactions, reprint the Billing Journal to record these changes.
- Print the Billing Cost Journal: Print the Billing Cost Journal as an audit trail of the billing cost transactions in Service Repair.
- Post Billings: When you Post Billings, the system updates General Ledger, Accounts Receivable History, and Accounts Receivable Open Invoices.
- Close Jobs: Use the Close Jobs function to finalize material and labor additions to the job transaction up to a chosen date.